
A lot of people know about Google Analytics, but not everyone has heard of Google Tag Manager. These two tools often get confused, because you can integrate them in a variety of useful ways. However, they each need to be set up separately, even if you intend to use them together.
By using Google Tag Manager in WordPress, you can use ‘tags’ to manage the JavaScript on your site that sends information to third-party services. For example, you can use Google Tag Manager in WordPress to set up Google Analytics and have it track custom events. The primary benefit of Google Tag Manager is that it’s much simpler than adding code manually.
In this article, we’ll talk more about what Google Tag Manager is and how it works. Then we’ll teach you how to set up Google Tag Manager in WordPress and use it to configure Google Analytics. Let’s get to work!
An Introduction to Google Tag Manager

These days, lots of websites use third-party services such as Google Analytics to collect data. This is because the information collected enables sites to target their services more accurately, and to identify areas that can be improved.
However, you’ll usually have to add some code to your site so that information can be passed along to relevant data collection programs. What Google Tag Manager does is provide you with a way to integrate code into your site and manage it using a single tool. Google Tag Manager in WordPress works very well with Google Analytics, and with other in-house products such as Adwords. Plus, it integrates with several external services, including Twitter, Bing Ads, and more.
The best part is that, through these integrations, Google Tag Manager helps you fine tune what data you wish to acquire from your site. For example, you can use this solution to add Google Analytics to your website, and set up new metrics and events for it to track. You can do this without an additional tool, but that usually requires you to add custom code. By using Google Tag Manager in WordPress, the process is greatly simplified.
Key Features
- Integrate multiple services with your website using a single tool.
- Add any code that the services supported by Google Tag Manager require to work.
- Configure the metrics you want your third-party services to track, using a ‘tag’ system.
- Test your tags using built-in debugging tools.
Price
As is usually the case with Google products, there are both free and paid versions available for Google Tag Manager. In our experience, the free version of the service is more than powerful enough for most cases. If you’re interested in getting some advanced features, however, you might consider investing in Google Tag Manager 360 (its prices vary depending on how you intend to use the platform).
How to Set Up and Use Google Tag Manager in WordPress (In 4 Steps)
Setting up Google Tag Manager in WordPress can be done in two simple steps. However, we’ve also included two extra steps in this tutorial, to demonstrate how Google Tag Manager can actually be used alongside Google Analytics.
Step 1: Set Up a New Google Tag Manager Account
The first thing you’ll need to do is set up a Google Analytics account. Then log into your Google account, and access the Google Tag Manager platform. When you do that, you’ll be prompted to set up a new account for the website you want to connect to Google Tag Manager. Choose a name for your site, and indicate which country you’re using the service from:

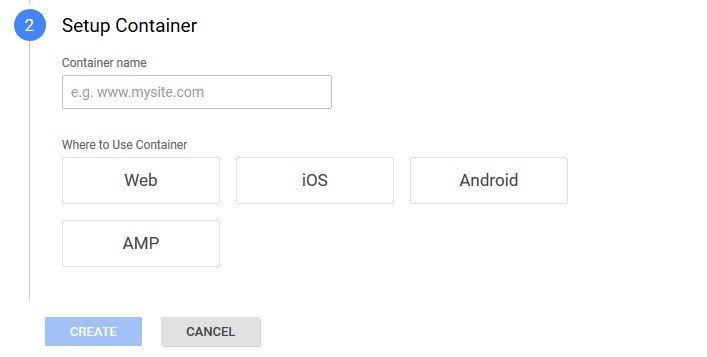
Next, click on the Continue button. The service will ask you to indicate your site’s URL, and to choose which platform you intend to use this ‘container’ on. Since you want to use Google Tag Manager in WordPress, go with the Web option and select Create:
The terms of service agreement will display next. After you accept it, your new container will be up and running.
Step 2: Install Google Tag Manager Via Your header.php File
As soon as you set up your Google Tag Manager account (also known as a container), the platform will display a couple of code snippets you’ll need to add to your site. The first one goes within the <head> tags for every page on your site, whereas the second one goes with the <body> tags:

Instead of adding all that code to each page, it’s best to edit your active theme’s header.php file. That way, WordPress will automatically add both snippets to all pages while you’re using that theme. To do this, you’ll need to use File Transfer Protocol (FTP), which enables you to access your website and send files back and forth (as well as edit them).
To use FTP, you’ll need a client that supports the protocol. FileZilla is an excellent solution that’s beginner-friendly and easy to use. Once you install and run FileZilla, the program will ask you to enter your FTP credentials, which are not the same as the ones you use to access WordPress. Most web hosts will assign you unique FTP credentials, and you can usually find them through your hosting control panel.
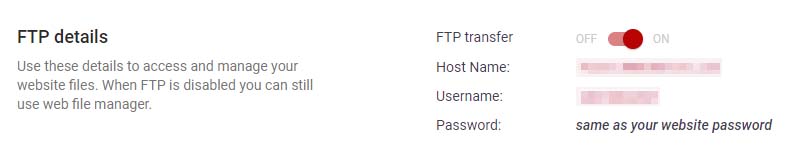
If you’re an 000Webhost user, for example, your FTP credentials will show up on your hosting dashboard under Settings > General:
With these credentials in hand, open FileZilla again and type them into the empty fields at the top of the screen, then click on Quickconnect:

When FileZilla connects to your website, two folders will show up in the bottom-right quadrant of the screen. The one we’re interested in is called public_html. This is also known as your WordPress root folder, since it contains all your website’s core files:

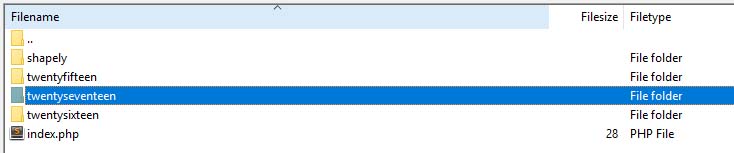
Open this folder now, and navigate to the wp-content/themes directory. There should be several folders inside, one for each theme installed on your website. Find the one that corresponds to your active theme:
Access that folder now, and look for the header.php file within. Once you locate it, right-click on the file and select the View/Edit option. This will download a copy of the file to your computer, and open it using your default text editor. The contents of your header.php file will vary depending on the theme you’re using, but there are only two parts that matter right now. There should be two tags near the top of the screen that read <head> and </head> with some code in between, like this:

You’ll want to paste the first part of your Google Tag Manager script within those two tags. Here’s an example of how that code might look:
<!-- Google Tag Manager -->
<script>(function(w,d,s,l,i){w[l]=w[l]||[];w[l].push({'gtm.start':
new Date().getTime(),event:'gtm.js'});var f=d.getElementsByTagName(s)[0],
j=d.createElement(s),dl=l!='dataLayer'?'&l='+l:'';j.async=true;j.src=
'https://www.googletagmanager.com/gtm.js?id='+i+dl;f.parentNode.insertBefore(j,f);
})(window,document,'script','dataLayer','GTM-XXXXXXX');</script>
<!-- End Google Tag Manager -->
Keep in mind that the above code shouldn’t be used verbatim, because it doesn’t include your account’s unique identifier. We’ve included it to give you a general idea of how the code should appear. Also, make sure that when you copy and paste your own snippet, it doesn’t interfere with any of the existing code within the head tags. The easiest way to do this is to add the code right after the first tag, or right before the final one.
Moving on, you’ll also need to add a second snippet of code after your body tag. We’ve highlighted an example of how that tag should look in the screenshot below:

Now, here’s an example of how your Google Tag Manager body code should look:
<!-- Google Tag Manager (noscript) -->
<noscript><iframe src="https://www.googletagmanager.com/ns.html?id=GTM-XXXXXXX"
height="0" width="0" style="display:none;visibility:hidden"></iframe></noscript>
<!-- End Google Tag Manager (noscript) -->
In this case, we recommend adding the code right after the first line with a body tag. When you’re done, save your changes to the file and close it. FileZilla will ask you if you want to replace the version of the file on your server with the one you just edited. Make sure to say yes, or Google Tag Manager won’t be active on your site.
That’s it! You just successfully set up Google Tag Manager in WordPress. Now, let’s look at an example of how you might put Google Tag Manager into action.
Step 3: Set Up Google Analytics Using Google Tag Manager
As we mentioned earlier, you can integrate Google Tag Manager with Google Analytics. This lets you gather data pertaining to specific aspects of your WordPress site. In this example, we’ll show how you can track the page views on your website.
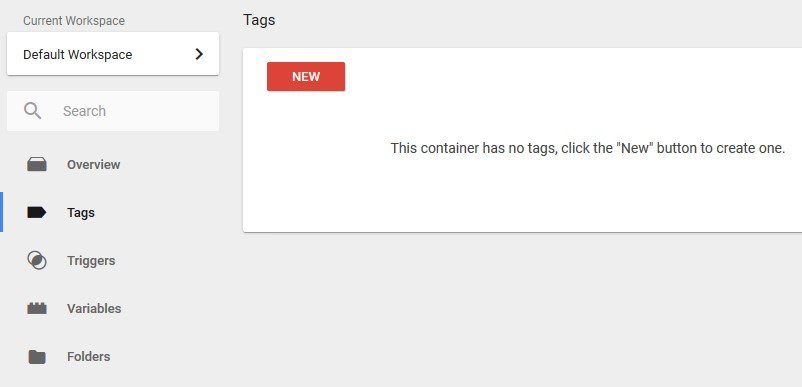
To do this, go to your Google Tag Manager dashboard and select the Tag tab. A new page will open, with a button labeled New. Click on it now:
Then, select the Tag Configuration option on the window that pops up next:
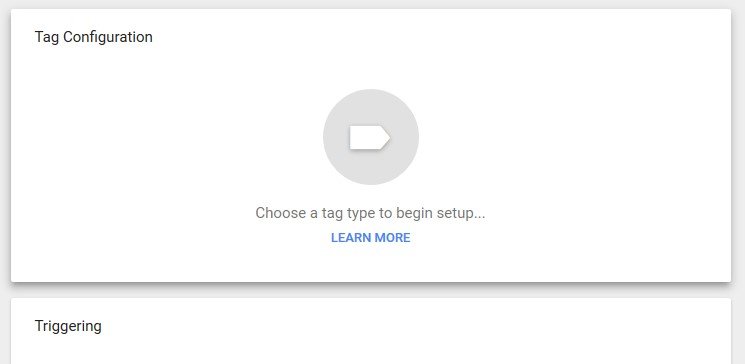
Multiple options will appear now. Select Universal Analytics, as this offers the best way to integrate Google Analytics with WordPress:
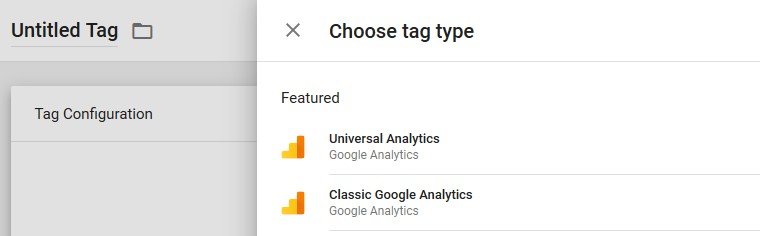
Once you choose the integration you want, Google Tag Manager will ask you what events you want to track. The default option is set to page views, which works well for our example. Next, select the option that reads Enable overriding settings in this tag. A new field will appear, asking you for your Google Analytics Tracking ID:
![]()
Since you already have a Google Analytics account set up for your website, you should also have a tracking ID. To find it, go to your Google Analytics dashboard and enter the Admin tab. Once there, look for the section called Tracking Info under your website’s name:
![]()
If you click on the Tracking Code tab, you’ll find your Tracking ID right near the top of the screen:
![]()
Return to Google Tag Manager, and paste that code into the Tracking ID field in your new tag’s settings:
![]()
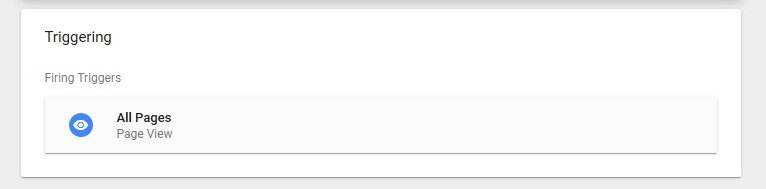
Now, move on to the Triggering tab. Here, you can configure the trigger Google Analytics will use to record the event you chose. Since you’re tracking page views, set the trigger to Page View for All Pages:
Select the Save button at the top of the screen, and Google Tag Manager will store your new tag. However, it’s not ready to go just yet. If you want your new tag to work, you’ll need to click the Submit button at the top of the screen:

With that, you’ve successfully added Google Analytics tracking for a specific event to your website. Now, let’s see if it’s working.
Step 4: Check Out Your Website’s Analytics
In the previous step, you configured Google Analytics to track page views on your website. Keep in mind that if you want to add additional tags to your website, you’ll need to do so on a case-by-case basis, following the same instructions.
For now, let’s confirm that your new tag is working. To do that, go to your Google Analytics dashboard and look for the Behavior > Overview tab. Once there, you should see several metrics relating to page views:
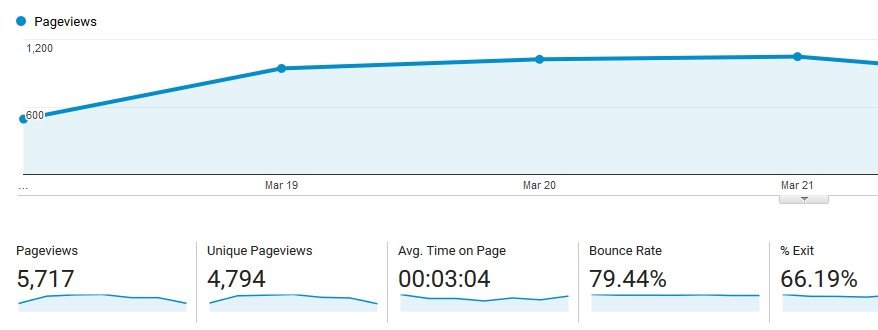
Keep in mind that the screenshot above contains data collected from a well-established website, so don’t be discouraged if your numbers aren’t that high. From this point on, you can keep an eye on your page views, and use this information to make improvements to your site.
Conclusion
Using Google Tag Manager can be intimidating at first. Like most other Google tools, there’s so much you can do with it that getting started can be difficult. However, using Google Tag Manager in WordPress isn’t particularly complicated. Plus, it enables you to do a lot of useful things, such as adding Google Analytics tracking to your website.
To recap, here’s a quick rundown of how to use Google Tag Manager to set up Google Analytics in WordPress:
- Set up a new Google Tag Manager account.
- Install Google Tag Manager via your header.php file.
- Set up Google Analytics using Google Tag Manager.
- Check out your website’s analytics.
Do you have any questions about how to use Google Tag Manager in WordPress? Ask away in the comments section below!