
WordPress is a fantastic platform to run most types of websites. However, just as with any other platform, you’ll occasionally run into an error or a bug. ‘Error 403’, for example, isn’t particular to WordPress alone, but troubleshooting it on the platform requires a little finesse.
The good news is we know what causes this particular error in most cases. An error 403 or ‘403 forbidden‘ message is the result of a problem with permissions on the platform. That means there’s something preventing you from accessing files you should usually be able to interact with. Most importantly, fixing it isn’t particularly complicated.
In this article, we’re going to talk a bit more about what error 403 is and its causes. Then we’ll teach you three ways to fix it, so as not to leave any stone unturned. Let’s get to work!
What Error 403 Is in WordPress
Error 403 often stems from problems with file and folder permissions.
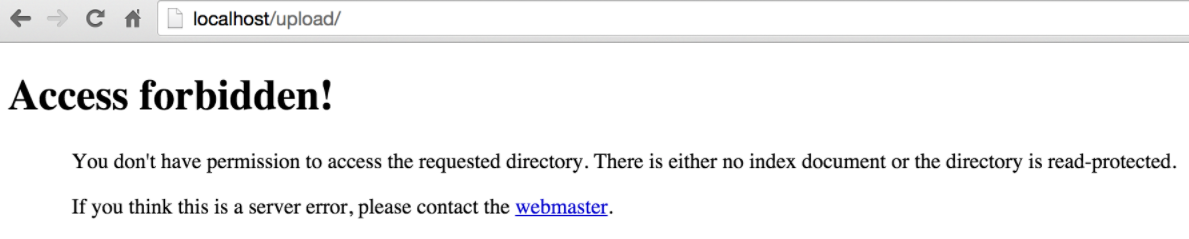
403 errors occur when you try to access a page you don’t have the privileges to view. It’s commonly accompanied by a message, such as You don’t have permission to access X on this server. In most cases, the error will pop up in one of three situations:
- When you’re trying to access your dashboard or login page.
- While you’re installing WordPress.
- While trying to access any page on your website.
The exact message accompanying the error can vary, but in any case, the problem still has to do with improper permission settings. To put it another way, every file on a computer carries instructions on how users can interact with it. As a WordPress administrator, you should have full access to every file and folder of your installation. However, in some cases, these permissions can be set improperly, which brings us to the next section.
What Causes Error 403 in WordPress
We already know that improper permissions are at the core of error 403. However, in practical terms, there are three common culprits that can cause this problem to arise:
- Someone changed your file and folder permissions. In some very rare occasions, server-side changes can cause this error to pop up if your files were modified.
- A corrupted .htaccess file. This file tells WordPress how to interact with the server where it’s hosted, and provides instructions on how to access files and directories.
- A problem with a plugin. Some WordPress security plugins can be a bit overzealous when it comes to blocking IP address ranges to protect your website. If you’re using one such plugin, it may be behind the sudden appearance of error 403.
In most cases, tackling these issues one by one should make error 403 go away. If you’ve never troubleshooted an error in WordPress before, don’t worry about it – we’ll guide you through the entire thing.
How to Fix the 403 Forbidden WordPress Error (In 3 Ways)
Before we get to work, you should create a backup of your website in case something goes wrong. In fact, you should get in the habit of creating regular backups as standard, since they can prove to be a godsend when dealing with any WordPress-related errors. We include the All-in-One WP plugin as part of every new 000Webhost WordPress website, which gives you an easy way to protect it.
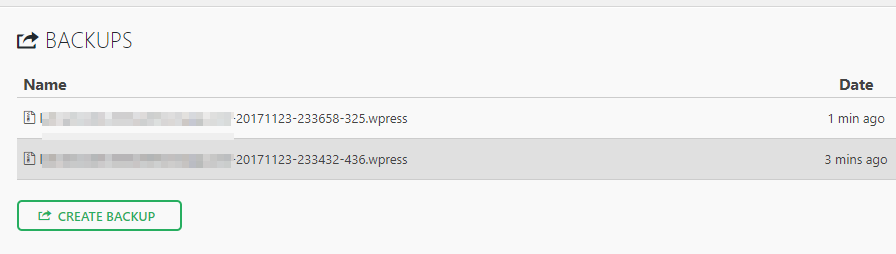
At this point you may not have access to your dashboard, but if you do, you can create a new backup by going to the All-in-One WP Migration > Backups tab and clicking on the Create Backup button:
At this point, you’ll be able to choose where you want to save your backup to:

Choose the File option and the plugin will enable you to download a copy of your website to your computer. If you ever want to restore it, you can do so from the All-in-One WP Migration > Import tab by uploading that file. It’s very straightforward. Now, let’s discuss three ways to troubleshoot error 403.
1. Disable Your Plugins
For this method, we’re going to assume you can’t access your dashboard. If you can, navigate to the Plugins tab and try disabling any active security plugins you might have. If that doesn’t make the error go away, you can move on to step number two.
However, in many cases you won’t be able to access your dashboard at all. This means we’re going to need to use File Transfer Protocol (FTP) to access your files. Simply put, FTP enables you to transfer data back and forth from your server (as well as edit them), all without a browser.
To do so, you’re going to need an FTP client, such as FileZilla. Feel free to download it now, but before you open it, log into your 000Webhost control panel and jump to the Settings > General tab. Inside, you’ll find a set of FTP credentials, which you need to use FileZilla:

Take note of your Host Name and Username. Your FTP password should be the same as your website. Now install and open FileZilla as you would any other program. At the top of the screen, you’ll find three fields (ignoring Port): Host, Username, and Password:

Fill those fields with the information you wrote down earlier and click on the Quickconnect button to the right. Now, your server’s main folders will appear on the lower-right side of your screen:

Once you’re in, follow these instructions to disable the plugin you think may be the culprit:
- Go into the public_html folder.
- Locate the wp-content > plugins folder.
- Change the name to something you will remember, such as plugins-disabled.
This essentially causes WordPress to create a new plugins folder upon loading. If you can now access your site, a plugin is at fault. At this point you’ll need to carry out the following steps:
- Revert the plugins-disabled folder back to its original name, and navigate into it.
- Right click the first plugin, and rename it to something you’ll remember such as akismet-disabled.
Here, you’re essentially checking which plugin is at fault, given you know it’s one of them. If you try to access your site and find the error is gone, simply delete the offending plugin. At this point, you’ll want to contact the developer for a fix, and depending on how vital the plugin is to your workflow, source an alternative.
On the other hand, if the error persists, revert the plugin’s folder to its original name, and move onto step two.
2. Generate a New .htaccess File
As we mentioned earlier, your .htaccess file tells WordPress how to interact with its server. It can also contain instructions about who can access certain files and directories in your WordPress setup. In other words, it’s critical to your website’s well being.
There are a lot of cool things you can do by playing around with your .htaccess file. However, that’s a subject for another time. In this case, we’re going to reset the file to its original version to roll back any changes that might have caused the error. Here’s the quick version of how to find the file:
- Access your website via FTP using the instructions from the first section.
- Enter the public_html directory.
- Look for the .htaccess file, right-click on it and hit the Download option.
- After downloading the file, delete it.
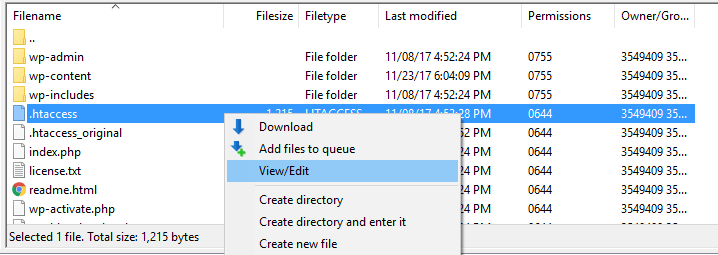
Don’t worry – deleting your .htaccess file won’t break your website. In any case, the copy you downloaded can easily be re-uploaded if you find there’s no issue with it. For now, right-click anywhere within the public_html directory and choose the Create new file option. The program will ask you what name you want to set for your file now:

Type .htaccess and confirm your choice. Now, right-click on your new file and hit the View/Edit option:
This will open the file locally using your default text editor. The file should be empty now and here’s the code you want to paste within it:
# BEGIN WordPress

<IfModule mod_rewrite.c>
RewriteEngine On
RewriteBase /
RewriteRule ^/wp-content/hostinger-page-cache/ - [L]
RewriteCond %{REQUEST_METHOD} !POST
RewriteCond %{QUERY_STRING} !.*=.*
RewriteCond %{HTTP_COOKIE} !(wordpress_test_cookie|comment_author|wp\-postpass|wordpress_logged_in|wptouch_switch_toggle|wp_woocommerce_session_) [NC]
RewriteCond %{DOCUMENT_ROOT}/wp-content/hostinger-page-cache/$1/_index.html -f
RewriteRule ^(.*)$ /wp-content/hostinger-page-cache/$1/_index.html [L]
</IfModule>

<IfModule mod_expires.c>
ExpiresActive On
ExpiresByType image/jpg "access plus 1 year"
ExpiresByType image/jpeg "access plus 1 year"
ExpiresByType image/gif "access plus 1 year"
ExpiresByType image/png "access plus 1 year"
ExpiresByType text/css "access plus 1 month"
ExpiresByType application/pdf "access plus 1 month"
ExpiresByType text/javascript "access plus 1 month"
ExpiresByType image/x-icon "access plus 1 year"
ExpiresDefault "access plus 1 weeks"
</IfModule>

<IfModule mod_rewrite.c>
RewriteEngine On
RewriteBase /
RewriteRule ^index\.php$ - [L]
RewriteCond %{REQUEST_FILENAME} !-f
RewriteCond %{REQUEST_FILENAME} !-d
RewriteRule . /index.php [L]
</IfModule>

# END WordPress
Keep in mind – that’s not the default .htaccess code you’ll find in most installations. It’s a custom version we set up for every 000Webhost user, which includes a few optimizations to keep things running smoothly. After pasting the code, save the changes to the file and close your editor. Now FileZilla will ask you if you want to overwrite your existing .htaccess file with the new version you just created – say yes.
If your .htaccess file was behind error 403, accessing your website should show it running as normal. On the other hand, if the error persists, there’s still one more fix you can apply.
3. Check (And Fix) Your WordPress File Permissions
For this last method, we’re going to go over your WordPress files and folders to check if they have the correct permissions. We’ll use FileZilla for this, but before we dive in, let’s talk about how these permissions work.
In Unix-based systems, you can configure your files and folder’s permissions using numerical codes consisting of three digits. For example, if you set a file’s permissions to 777, any user can access, edit, and execute it. Generally speaking, you don’t want everyone to have full access to your files and folders. Instead, its better if you limit permissions depending on which type of user is trying to access your directories.
We could spend an entire article talking about permission codes and their permutations. For now, these are the two you should know:
- 755. This is the code you should use for your WordPress folders. It means the directories’ owner (that’s you!) can read, edit, and execute them, which in this case stands for accessing those folders. Moreover, it establishes that other users may only read and access the folders, but not edit them.
- 644. This code should be reserved for files only and not directories. It tells WordPress the owner of those files can read, edit, and execute them. Other people will only be able to read them.
It’s critical you don’t set your files and folder’s permission levels without understanding what each code does. Otherwise, you might find yourself with a giant security issue in your hands. To start, log into your server via FTP, and work through the following steps:
- Access your public_html folder.
- Select all of the folders within (and only the folders), right-click on them and choose the File Permissions option.
- Look for the numeric value field and set it to 755, but don’t close the window yet.
- Tick the option that says Recurse into subdirectories and choose the Apply to directories only setting, then click on OK.
- Select all the files and folders within your public_html directory, right-click on them and return to the File Permissions screen.
- Set their value to 644 and choose the Apply to files only setting after enabling the Recurse into subdirectories option.
- Save your changes.
There’s a lot to unpack here so let’s break it down. During the first half of those instructions, you selected the wp-admin, wp-content, and wp-includes folders. Then, you instructed WordPress to set their permissions to 755 as well as to apply that change to every single subdirectory, without touching their files.

Then, we repeated that process – only this time we targeted just your files and set their permission levels to 644.

The process is straightforward once you get the hang of it, and it should have fixed error 403 on your website. Try accessing it now to confirm that everything’s working again (which it should be!).
Conclusion
As far as WordPress bugs go, error 403 isn’t particularly troublesome. It’s definitely not in the same league as the ‘White Screen of Death’ or 502 bad gateway errors, which doesn’t even have the courtesy to provide you with an error message. Error codes such as 403 are key, since they tell you what’s wrong with your website and help you figure out how to fix it.
When it comes to error 403, here are the three main ways you can fix the problem (after backing up your website!):
- Disable your plugins.
- Generate a new .htaccess file.
- Check (and fix) your WordPress file permissions.
Do you have any questions about how to fix the 403 forbidden error in WordPress? Ask away in the comments section below!