
One of the things you learn as your website grows is that performance is critical. These days, most people expect your site to load quickly, and they don’t have much patience unless it does. ‘Caching’ – essentially a way of keeping your loading times lean that we’ll talk more about shortly – is a key way to keep your website’s visitors happy.
Browser caching enables your website to load faster by cutting down on how much information users need to re-load after their first visit. It’s a simple way to reduce loading times, and anyone can implement it on their website.
In this article, we’re going to talk about what browser caching is and what it means to leverage it in WordPress. Then we’ll talk about when you should disable caching and how to set it up in the first place. Finally, we’ll help you check if caching is working as intended on your website. Let’s get to work!
An Introduction to Browser Caching
If set up correctly, websites will often save some of their files to your computer. That way, you won’t need to load the entire thing over the internet each time you revisit it. This process is known as browser caching.
In most cases, websites will try to cache as many static elements as they can to improve their loading times, including images, scripts, and more. In short, there are some elements that remain mostly unchanged, so it doesn’t matter if you load them from your computer or over the web. The primary difference is that loading them from your computer is a lot faster.
To avoid mishaps, most modern browsers will quickly check if any of their cached elements have changed each time you load a website. That way, they can replace those that were updated on the fly, and things remain speedy. It sounds complicated, but it’s a well-established practice that benefits everyone – here’s how:
- Fast loading websites have lower bounce rates. When someone visits your site and leaves right away without interacting with anything, we call that a ‘bounced’ visitor. Most websites have a lot of these types of visitors, but you can minimize your bounce rate by keeping loading times lean.
- Your visitors have a smaller load time. There’s nothing more frustrating than a site that takes too long to load. Improving those times keeps them happy, and hopefully coming back for more.
Out of the box, WordPress doesn’t provide you with a way to configure your caching settings, which isn’t optimal. If you want to squeeze every last bit of performance out of your website, you’ll need to figure out a way to configure how it handles caching. We’ll deal with that in a minute, but for now, let’s talk about expiration dates for your cached pages.
What It Means to Leverage Browser Caching in WordPress
Setting expiration dates for your cached content is better from a performance perspective.
Ultimately, leveraging browser caching in WordPress means to configure the expiration dates for your cached content. Previously, we talked about how browser caching enables applications to check if the content they saved has changed. However, this feature doesn’t always work as intended, so you need to add a failsafe. The best approach is to configure expiration dates for your cached content. Here’s why it works:
- It helps prevent situations where users load outdated content. Expiration dates tell browsers to check back for updates after a certain amount of time. Setting a reasonable timeframe enables you to ensure users aren’t loading outdated content from their cache.
- It saves users from having to clear their browser caches manually. Any of your visitors can always clear their browser’s cache manually through their settings. However, you don’t want to depend on your users being tech-savvy, so it pays to leverage browser caching in WordPress.
Imagine, for example, that you choose to update your home page with all new images, and revamp your Cascading Stylesheets (CSS). If your visitors’ browsers saved those files in their cache, they might be loading outdated versions of your page. They wouldn’t see any indicator there’s an error – and you wouldn’t be able to tell on your end either.
Setting reasonably low expiration dates for your cached content can help prevent that scenario from occurring. The trick lies in finding the right balance so your visitors can still enjoy the benefits of browser caching.
Why You Should Disable Browser Caching While You’re Updating Your Website
Enabling browser caching is definitely an excellent idea for most websites. However, it does pose problems when you update your site. Going back to the updated home page example, imagine your website is undergoing a significant update rather than one page – it’s clear that this could present an even greater problem for you and your visitors.
Leveraging browser caching in WordPress tackles this issue, but it’s not a good solution when you’re making multiple updates per day. If you’re ever in such a situation, your best bet is to simply disable browser caching altogether until you’re done updating your website.
How to disable browser caching will depend on which method you used to implement it in the first place. In the next section, we’ll talk about two ways you can apply browser caching, and how to disable them in case you need to.
How to Leverage Browser Caching in WordPress (In 2 Ways)
When you’re adding a new feature to your WordPress website, you’ll often find an available plugin solution, which is almost always the easiest to implement. However, manually implementing a solution is entirely possible too if you have the expertise. In this section, we’ll explore both approaches when it comes to implementing browser caching and expiration dates.
1. Use a Caching Plugin
For the uninitiated, WordPress plugins are simple add-ons that enable you to extend the platform’s functionality. You can install them in a matter of minutes and add all sorts of features that WordPress doesn’t include by default.
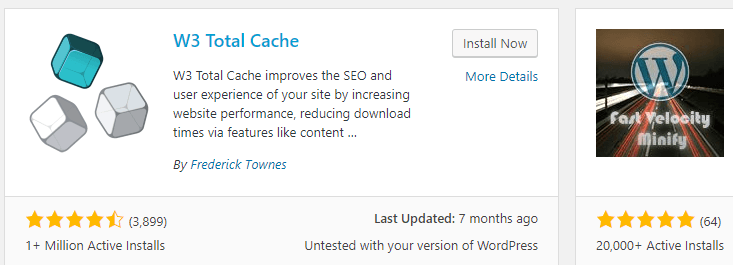
Since caching is an extremely popular feature, there are dozens of plugins that can help you implement it in WordPress. The most popular free option is W3 Total Cache, which enables you to deploy robust browser caching, among other features:
To install the plugin, go to your WordPress dashboard and enter the Plugins tab. Click on the Add new button at the top of the screen and type W3 Total Cache into the search bar on the next page. The plugin should show up as the first option at the top left side of the results:
Click on the Install Now button, then wait while WordPress downloads the necessary files. When it’s done, the button will change to a blue one that says Activate, which you should also click.
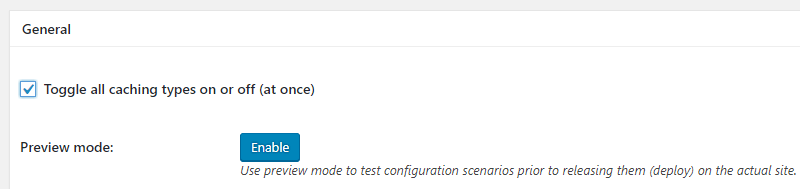
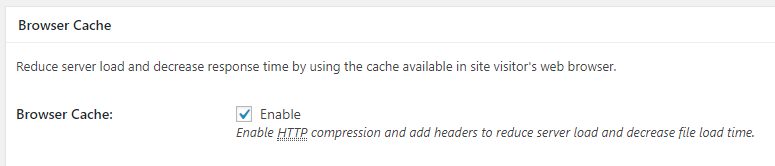
Once that’s complete, a new Performance tab will show up on your dashboard, which contains W3 Total Cache’s settings. Click here, then choose the General Settings option. Inside, you’ll find a long list of cache settings you can play around with. For first time users, we recommend ticking the box that reads Toggle all caching types on or off (at once):
This will enable various kinds of caching on your site, including a browser-side option:
Before you save your settings, scroll down to the CDN section and disable it for now. A Content Delivery Network (CDN) is a service that enables you to serve cached copies of your site from a worldwide network of data centers. Most CDNs are premium services, and you need to configure them to work your with your website before you can integrate them with plugins such as W3 Total Cache. However, they are a great option for speeding up your website – but that’s a topic for another article. For now, return to the top of the page and click on the Save all settings button right below the Toggle all caching types on or off (at once) option.
If you’re ever in a situation where you need to temporarily disable caching for your website, you can just return to the General Settings tab and toggle it off. Then turn it back on when you’re done updating your site.
2. Modify Your .htaccess File
Every WordPress installation has its own .htaccess file. It’s one of WordPress’ core files, and it tells your server how to interact with specific directories or files. Because it’s a crucial WordPress system file, you should back up your site before making any changes.
You can do all sorts of interesting things by playing around with your .htaccess file, such as limiting who can access your dashboard – and enabling browser caching. However, you can’t modify this file from your dashboard, so you need to pop the hood of your WordPress installation.
The best way to do this is by File Transfer Protocol (FTP). This enables you to send and receive files from your server securely, just like a regular download. In most cases, FTP access requires its own set of credentials, which most hosting providers email to you when you sign up. If you can’t recall what yours are, log into your 000Webhost panel and go to the Settings > General screen. You’ll find the information you need right at the top:
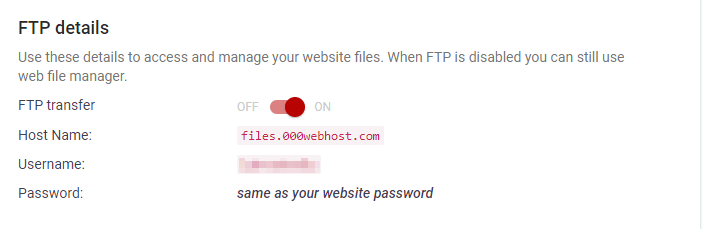
Take note of your Host name, Username, and Password. You’ll need them after you download and install an FTP client. We recommend using FileZilla if you don’t already have one, since it’s an excellent open-source option.
Download and install FileZilla now, then open it and look at the top of the app’s screen. You’ll see three fields under the toolbar called Host, Username, and Password:
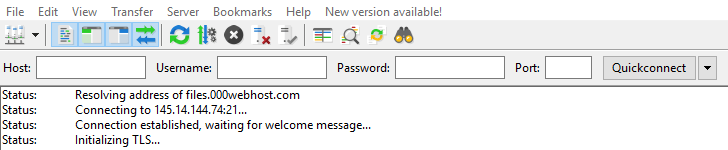
Type in your 000Webhost credentials and click on the Quickconnect button to the right. After the software establishes a connection, you’ll see a list of folders appear to the right:

Those are your server’s main directories. Once you can see them, follow these steps:
- Enter the public_html folder.
- Look for the .htaccess file within that directory.
- Right-click on the file and choose the View/Edit option.
This will open .htaccess locally using your default text editor. Any changes you make now can be saved, and your FTP client will automatically update the file on its end. If you’re not a 000Webhost user, your .htaccess file should look something like this:
# BEGIN WordPress
<IfModule mod_rewrite.c>
RewriteEngine On
RewriteBase /
RewriteRule ^index\.php$ - [L]
RewriteCond %{REQUEST_FILENAME} !-f
RewriteCond %{REQUEST_FILENAME} !-d
RewriteRule . /index.php [L]
</IfModule>
# END WordPress
That’s what a default .htacess file looks like, and it includes only basic instructions. In our case, we also add cache instructions so your browser knows how often it should update its cached content:
<IfModule mod_expires.c>
ExpiresActive On
ExpiresByType image/jpg "access plus 1 year"
ExpiresByType image/jpeg "access plus 1 year"
ExpiresByType image/gif "access plus 1 year"
ExpiresByType image/png "access plus 1 year"
ExpiresByType text/css "access plus 1 month"
ExpiresByType application/pdf "access plus 1 month"
ExpiresByType text/javascript "access plus 1 month"
ExpiresByType image/x-icon "access plus 1 year"
ExpiresDefault "access plus 1 weeks"
</IfModule>
If you can’t make heads nor tail of that code, don’t worry about it. It simply tells your browser how often it should update its cached content depending on the content type. For example, we cache images for a year after access by default, hence the access plus 1 year snippets. Other types of files, such as PDFs, get a shorter update cycle since they’re more likely to change in the meantime.
Of course, it’s up to you if you want to modify the expiration times for the files on your website. All you have to do is tweak the part that comes after access plus to your liking for the types of files you want.
On the other hand, if your web host doesn’t leverage browser caching in WordPress by default, you’ll need to add a section such as the one we pasted here earlier. Just copy that entire code snippet and paste it between the following two lines:
# BEGIN WordPress
<IfModule mod_rewrite.c>
Then save your changes, and that’s it – you’ve just tweaked a WordPress core file! If you’re planning to revisit this file often, you might want to create a pristine copy of it. That way, you can replace it in case something goes wrong. Plus, you can also use it if you need to disable browser caching temporarily.
How to Check If Browser Caching is Working Correctly in WordPress
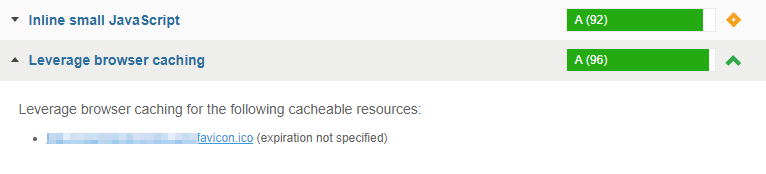
As we mentioned earlier, one of the biggest benefits of browser caching is improved loading times. However, that’s not something you might notice by just reloading your website. The best approach to test whether browser caching is working correctly is to use an online tool such as GTmetrix:

This free service enables you to test your loading times by typing in your URL and requesting an analysis. GTmetrix will then see how long your site takes to load and tell you what you can do to improve it. If browser caching is enabled on your website, you’ll see a message such as this one in your report:

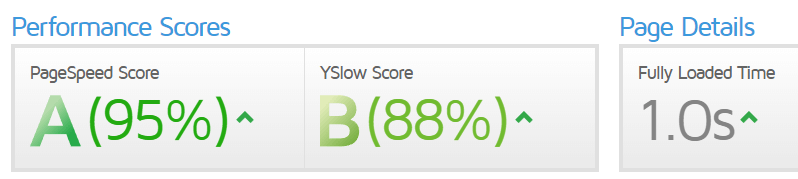
000Webhost websites are optimized out of the box for fast loading times, so you should see excellent results right after creating your site:
However, if you’re using Google Analytics (GA) on your website, chances are your browser caching score won’t be perfect. This is because GA uses an external script to pull information from your site, which means your visitors can’t cache it. Or at least they won’t be able to if you don’t implement a simple workaround to the issue. In this case, we recommend using the Complete Analytics Optimization Suite plugin:

This straightforward plugin enables you to host your GA analytics.js script on your own server, which means you can set an expiration date for it. The plugin also keeps the file updated on its own, and it enables you to integrate GA if you haven’t set it up yet. Analytics enables you to make smarter decisions by providing you with in-depth information about how your visitors behave, so you definitely should consider using GA.
After installing the plugin, go to your WordPress dashboard and into the Settings > Optimize Analytics tab. Inside, you’ll find the option to enter your GA tracking ID:
![]()
This ID is what identifies your website with the GA service, and you can find it by accessing that service. After entering your ID, just save the changes and the plugin will automatically configure everything else, including creating a local copy of the analytics.js file. Once you retest your site with GTmetrix, you should notice a much improved score.
Finally, it’s worth pointing out that while the plugin worked perfectly during our tests, it hasn’t been updated in a while. This means you’ll need to carry out your own tests to see if it plays nicely with your version of WordPress.
Conclusion
In the current climate, it’s highly important that a website is fast if it wants to remain competitive. The slower your site is, the more impatient your visitors will become, and they may end up going somewhere else to find what they need. That’s why implementing improvements such as browser caching is critical to your website’s success.
Before we wrap things up, let’s review the two main ways you can leverage browser caching in WordPress:
- Use a plugin to enable browser caching without having to tweak any files by hand.
- Modify your .htacess file to set expiration dates for your cached content.
Do you have any questions about how to leverage WordPress caching in WordPress? Let’s talk about them in the comments section below!