
WordPress is a Content Management System (CMS) that enables users to create beautiful and functional, blogs, websites, and e-commerce platforms. However, you may find that certain page elements are difficult to customize with the default options of WordPress. This includes your post types (i.e. the predefined templates that enable you to create posts and pages on your site).
One of the best ways to offer diversified content formats to your website’s visitors is with WordPress’ custom post types. You can use it to completely customize the way your content is displayed, as well as add functionality. This also means your audience gets a wider variety of content.
In this post, we’ll introduce WordPress custom post types and their uses. Then, we’ll offer up some WordPress plugins that will make the process of adding custom post types simple. Finally, we’ll teach you how to create custom post types on WordPress manually. Let’s get started!
What Custom Post Types Are (And Why You Should Use Them)
In simple terms, a custom post type is one created to your exact requirements. They can have a variety of purposes, and you’ll already see evidence of this with WordPress’ default post types. However, these cannot be altered, which means you’ll need to break out your code editor if you want to customize something bespoke.
There are plenty of benefits to using custom post types on your WordPress site, two of the major ones being:
- The ability to tailor each post type to fit your needs. For example, if you need extra field spaces or a special template, a custom post type will let you.
- The option to separate custom post types from other content types. This is useful when the post types are vastly different (e.g. a news page versus a blog stream).
However, many WordPress users find it difficult to know when to use custom post types on their website. There are no hard and fast rules, but a few situations often crop up. For example:
- When categories and tags won’t cut it. A hierarchy within your website is good, but sometimes it can go too far. With custom post types, you can more easily organize your pages without changing the hierarchy.
- When you need a specific template. This is common for news and review sites, as you may require a news stream or reviews section template.
As you can see, the versatility and use of custom post types are numerous. This means just about any website can benefit from implementing them.
3 WordPress Plugins for Creating Custom Post Types
Although you can add custom post types to your WordPress website manually, plugins generally present a simpler option. They’re a great tool for beginners, and many present a huge swathe of post type customization options.
However, on the flip side, if you deactivate your chosen plugin, all of the custom post types you’ve created will disappear. With this in mind, let’s take a closer look at three of the best WordPress custom post type plugins.
1. Custom Post Type UI
One of the most popular options available, Custom Post Type UI enables you to register both custom post types and taxonomies. The plugin provides an easy-to-use interface, and no coding experience is necessary to use it. In addition to letting you register new post types, Custom Post Type UI lets you add them to RSS feeds. You can also add your new post types to navigation menus from within the plugin’s Settings page.
The plugin is free, although there is also an Extended version that starts at $29.00. This extended version will help you to display your custom post types, whereas the free plugin will only let you register them.
2. Toolset Types

Toolset Types is another popular custom post type plugin with hundreds of thousands of active installs. It walks you through the steps required to create custom posts (and their templates), and even user profiles. The plugin also enables you to add custom fields and taxonomies, meaning you can completely personalize your website’s content to fit your needs.
The basic plugin is free but does require knowledge of PHP. To avoid this altogether, you can purchase a Toolset account starting at $69. This will enable you to create custom post types (and other custom elements) without any coding.
3. Custom Post Type Maker

Custom Post Type Maker requires no coding whatsoever, making it one of the most user-friendly options on this list. The interface is very similar to that of WordPress’ default Editor, which means even beginners can become acquainted with it easily. The plugin also utilizes WordPress Media Uploader to allow you to easily manage the icons for your custom post types.
Custom Post Type Maker is completely free, and there are no pro versions available. It’s an excellent, well-supported plugin to get started with!
How to Create Your Own WordPress Custom Post Type (In 5 Steps)
It is possible to create custom post types for WordPress manually. Though beginners should be aware that it does need some coding. However, even inexperienced WordPress users can get their own basic custom post types up and running in no time with the five steps below.
Before we begin, remember that it’s always best to backup your website before making any changes to it!
Step 1: Register the Post Type
Registering the post type is the first step, as it establishes the presence of a new post type on the back end. Go to your WordPress backend, and navigate to Appearance > Editor from the menu on the left-hand side. Select functions.php from the Theme Files menu to the right of the editor, and paste in this code:
// Creates News Custom Post Type
function news_init() {
    $args = array(
      'label' => 'News',
        'public' => true,
        'show_ui' => true,
        'capability_type' => 'post',
        'hierarchical' => false,
        'rewrite' => array('slug' => 'news'),
        'query_var' => true,
        'menu_icon' => 'dashicons-video-alt',
        'supports' => array(
            'title',
            'editor',
            'excerpt',
            'trackbacks',
            'custom-fields',
            'comments',
            'revisions',
            'thumbnail',
            'author',
            'page-attributes',)
        );
    register_post_type( 'news', $args );
}
add_action( 'init', 'news_init' );
We’ve used News as our post type to create a News stream for our website. However, you can create practically any page you can imagine, including testimonials, movie reviews, and more. To change the post type, simply replace any instance of News with your preferred label. Once you’ve made those changes (if necessary), click Update File.
Before moving forward, it’s helpful to know what each different aspect of the code above means. The three main elements are:
- $args: An array of arguments for registering the post type.
- label: The name of the post type as it will appear in your navigation menu.
- public: Should the post type be shown in the admin User Interface (UI)?
- show_ui: Should the post type have an admin panel?
- capability type: How will WordPress ‘treat’ this post type?
- rewrite: Will permalinks be rewritten to include the post type’s slug?
- query_var: Will the post type display when called?
- menu_icon: Will the post type have a menu icon?
- supports: An argument that establishes which elements the post type supports. Essentially, what will appear on the Add New page for the custom post type.
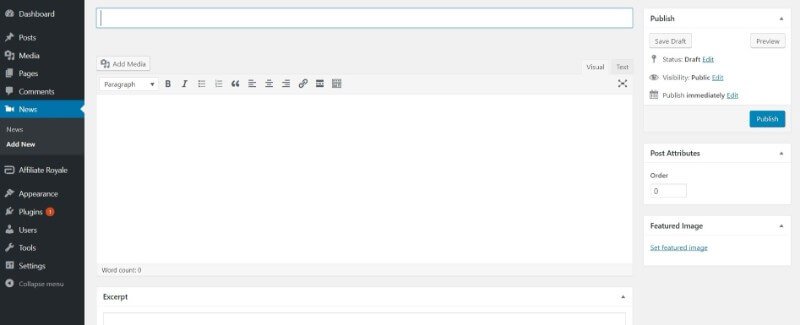
When combined, these various elements establish the custom post type and register it on the WordPress backend. With the code added to functions.php, you’ll now find the custom post type on the left-hand side menu of your WordPress backend:

This is where you’ll create any posts that you’d like to be categorized as a News post.
Step 2: Create Example Posts to Test the Code
It’s now time to create posts to fill up your custom post type. They don’t need to be fully formed at this stage, as they’re just being used as examples to ensure the new post type is working.
Return to the WordPress dashboard, and hover over the new custom post type. Select Add New, and you’ll find an editor that’s similar to the standard post editor:
You’ll notice that each supports variable within the code above is also present on the page. This includes the Title, Editor, Excerpt, Custom Fields, and Post Attributes.
Create a few example posts – four or five should do – and click Publish. You’ll now have posts to display in the new custom type navigation menu (which we’ll get to shortly).
Step 3: Create the Custom Post Type Template
In simple terms, a template is a format for how your website will look to users. WordPress uses template files in themes to define how different content types – including pages and posts – will appear. This means when you create your own custom post type template, you have control over how your content is displayed.
This step requires you to add a new file to your theme folder, which can be done in two ways. One involves the use of a File Transfer Protocol (FTP). The alternative utilizes PHP and some simple file editing.
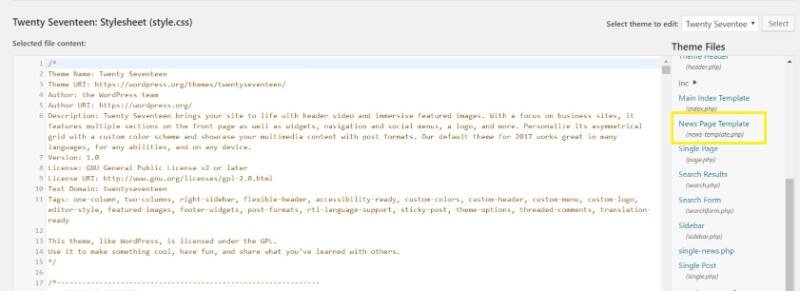
Navigate to Appearance > Editor and find the name of your current WordPress theme. It will be located at stylesheet.css file under Theme Name. Now, locate the header.php file to the right of the Editor, and add this code to the very top of the file:
<?php touch('wp-content/themes/theme-name/new-file.php'); ?>
Replace theme-name with the name of your theme (no spaces) and replace new-file with the desired file name. For our news page, we’ve used news-template. Click Update File, then navigate to the home page of your website. This creates the new file within your theme folder. To complete the process, return to Appearance > Editor > header.php.
You’ll notice your new file now appears in the files list to the left of the Editor. However, there’s one more step. Return to header.php and completely remove the code that you just added. Click Update File and you’re all set. Your file will still be in place:
Finally, we can add the code needed to load the template. Go to the news-template.php file and add this code:
<?php
/*Template Name: News*/
get_header();
query_posts(array(
   'post_type' => 'news'
)); ?>
<?php
while (have_posts()) : the_post(); ?>
<h2><a href="<?php the_permalink() ?>"><?php the_title(); ?></a></h2>
<p><?php the_excerpt(); ?></p>
<?php endwhile;
get_footer();
?>
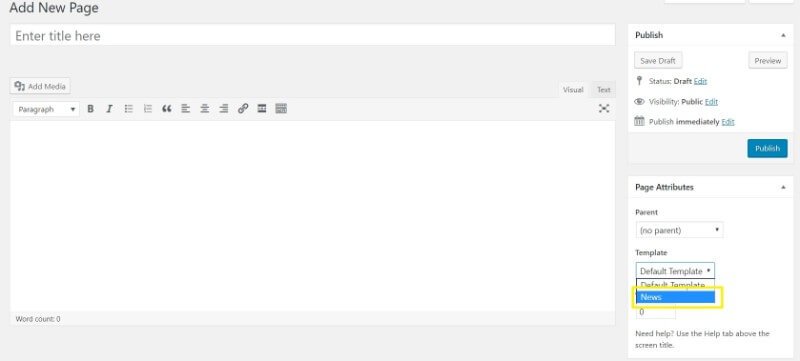
Click Update File. With your WordPress custom post type template created, return to the WordPress backend. Go to Posts > Add New and name the page as you wish. For our news page, we’ve simply titled it News. Find Page Attributes > Template on the right side of the editor, select your new template from the drop-down and click Publish:
This page will display the test pages you created, as shown below:

There are other ways to customize this page, including adding a description under each post title. We’ll cover that in more detail in the final step. For now, let’s move on to adding a menu.
Step 4: Add a Menu for Your Custom Post Type
Of course, you’ll want to ensure your website users can find the new custom post type. To do so, you’ll need to add it to your website’s navigation menu. Go to Appearance > Menus and find the name of your custom post type in the Most Recent list. Check the box, and click Add to Menu:
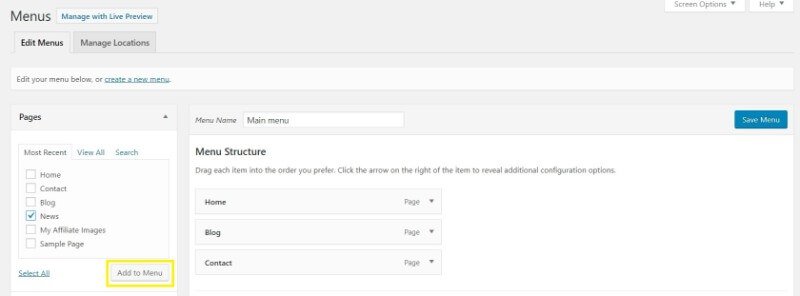
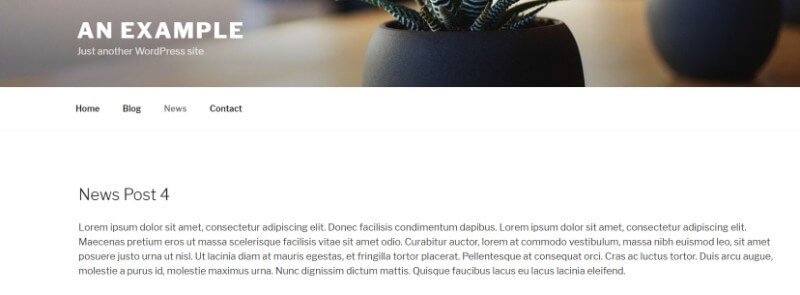
Click Save Menu and head to the front end of your WordPress website to see how it looks:

You can add your custom post type to any navigation menu on your website, so feel free to experiment!
Step 5: Create (And Display) a Dedicated Archive Page
Essentially, the archive page offers a description for each of your News posts so visitors will know what it’s about before clicking. This is an optional step, so feel free to skip it if you’d rather keep the format at the end of the previous step.
Here, you’ll need to add a new file just as you did in step three. This file will be titled single-news.php and, once created, add this code:
<?php
get_header();
/* Start the Loop */
while (have_posts()) : the_post();
get_template_part('template-parts/post/content', get_post_format());
endwhile; // End of the loop.
get_footer();
Return to your example posts (News > News) within WordPress, and add text to the Excerpt section right below the Editor. This is your post description, and it’s what will be used on the archive page. Click Publish, and go to your site’s front end. Click on News in the navigation menu and the page you’ll see will look like this:
You can (of course) choose to use the first paragraph of each post as the excerpt, or create your own.
Conclusion
All websites – including blogs, news sites, and even e-commerce storefronts – can benefit from a more diverse content. While it’s not the only method, WordPress makes this possible with the help of custom post types. In a nutshell, they let you create truly unique content for your website, limited only by your own coding expertise.
In this post, we’ve introduced WordPress custom post types and why you should use them on your site. We’ve also shown you exactly how to create and implement a custom post type in five steps. To recap, the steps are:
- Register the post type.
- Create test posts.
- Create the template.
- Add a menu for the custom post type.
- Create (and display) the archive page.
Do you have any question questions about WordPress custom post types? Let us know in the comments section below!