WordPress comments are often one of the best ways to engage with your users. However, not all types of websites will benefit from a comment system. For example, if you’re maintaining a business site or a personal portfolio, you probably don’t want people leaving random messages on your pages and updates.
Fortunately, WordPress provides you with a few ways to delete existing comments. You can even disable the comment functionality altogether, so no one can leave new messages going forward. Doing this is simple, either using a dedicated plugin or a manual approach.
In this article, we’re going to discuss why you might want to disable comments in WordPress, then teach you how. Let’s get to it!
Why You Might Want to Disable Comments in WordPress

Comments are an excellent way to stay in touch with your users, but they can be an issue on some websites.
WordPress comments can be useful in a lot of situations. For example, they can make your website appear more popular. The more comments people see on your posts, the more active they’ll know your site is. These ongoing conversations can even make new visitors feel more inclined to participate. Finally, comments are one of the best tools for finding out what visitors think about your content.
Of course, these benefits apply mostly to WordPress blogs. If you’re running a different type of website, it’s sometimes better to disable comments in WordPress. For instance, one of the major downsides of comment sections is that they’re prone to spam. When you’re running a blog, dealing with spam is (unfortunately) part of the job. However, it doesn’t make sense to put up with that extra work if you don’t need comments in the first place.
Another downside to enabling comments – even on a blog – is that they can make your content look dated. For example, if all the comments on an old blog post are dated several years ago, visitors may think the article is no longer relevant. That’s why a lot of websites refrain from showing publication dates on their content, so it can remain ‘evergreen’. Disabling comments is another way to accomplish the same goal.
For these reasons, whether you keep WordPress comments turned on largely depends on what type of website you have, and the kind of content you plan on publishing. If you want your website to be a place where people can have public discussions, comments are a must. On the other hand, if you’d rather be in control of all the content posted on your site, learning how to disable comments on WordPress can be helpful.
What To Do Before Disabling WordPress Comments
When you disable comments in WordPress, you’ll probably end up deleting existing comments as well. However, what if you change your mind at some point, and decide you want to turn the comments feature back on and restore those messages? In that case, you’ll want to have a backup you can use to return your website to its previous state.
We always recommend regular backups, regardless of what type of website you’re running. This is also a smart way to protect against unexpected errors and hacks. Fortunately, WordPress users have a lot of options for backing up their websites. If your site is set up on 000webhost, for example, you’ll already have access to the All-In-One WP Migration plugin:

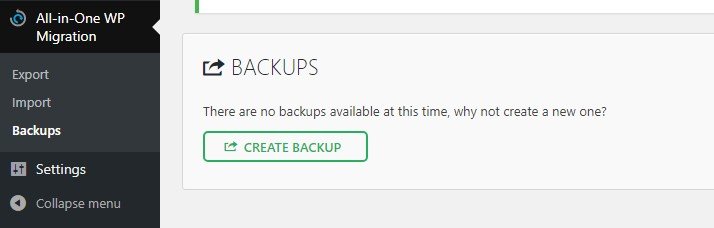
This tool’s main purpose is to help you migrate your website from one web host to another. However, it’s also an excellent option for creating and restoring backups quickly. To use it, simply navigate to the All-In-One WP Migration > Backups tab in your WordPress dashboard. Once there, click on the Create Backup button:
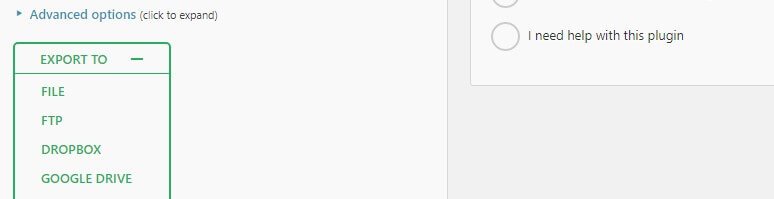
All-In-One WP Migration works by creating a snapshot of your entire website, and packing it into a single file. On the next screen, you’ll need to choose where you want to store that file. By default, the plugin will provide you with an option to download it to your computer. However, you can also connect your website to several cloud storage solutions, so your backups will be even more secure:
Once you choose how you want to store your backup, the plugin will put together the file and display a download link when it’s ready. Remember to store the file somewhere safe!
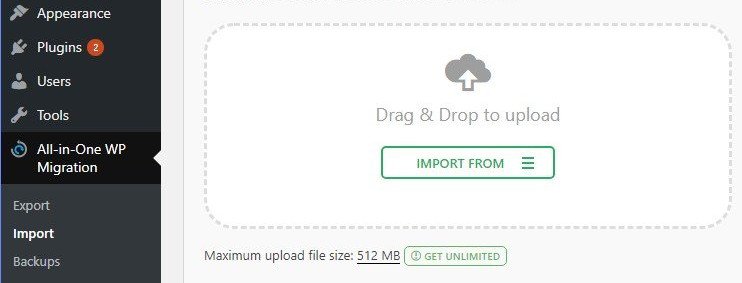
If you ever want to use this backup to restore your comments, you’ll need to visit the All-In-One WP Migration > Import tab and upload your backup. You can do this by either dragging and dropping the file onto the uploader, or navigating through your files to find it:
The plugin will then restore your website from the backup, which will override any changes you’ve made since that point.
You can also locate a list of your existing backups by going to All-In-One WP Migration > Backups, and clicking on the Restore button next to the file you want. This can be a more convenient method, especially if you have a lot of backups saved.
2 Ways to Disable Comments in WordPress
Once you have a backup in place, it’s time to get to work. What follows are two methods for disabling comments. We’ll start with the plugin approach, since it’s more straightforward, and then we’ll teach you how to disable comments on WordPress manually.
1. Use the Disable Comments Plugin
There are a few plugins that will let you disable comments in WordPress, but we’re partial to the aptly-named Disable Comments. This flexible tool enables you to turn off comments for your entire website, or just for specific types of content. It even removes all comment-related widgets from your editor, so they won’t clutter up your site.
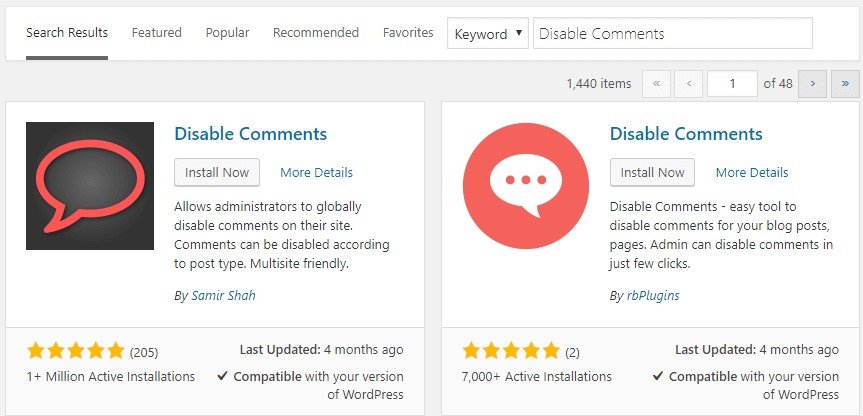
To get started, go to the Plugins tab in your dashboard and click on Add New. You’ll see a search bar to the right, where you can type in the name of the plugin. There’s more than one plugin called Disable Comments, so make sure you choose the one created by Samir Shah, with over one million installations:
Once you identify the correct plugin, click on the Install Now button next to its name. Then, give WordPress a little time to set the plugin up. When it’s ready to use, an Activate button will appear where the Install Now option used to be. Click on Activate, and the plugin will be ready to go.
To actually use Disable Comments, head to the new Tools > Delete Comments tab. The first thing you’ll want to do is delete your existing comments, to prevent them from showing up on your pages. This is something that can happen even after you disable comments in WordPress, depending on the theme you’re using.
There are four options within this tab. You can delete all your comments, or just those on a specific post type:
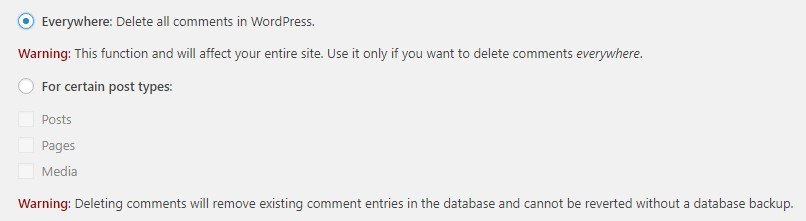
We recommend choosing the top option, to delete comments throughout your entire site. You already have a backup in place, so restoring them won’t be difficult if you change your mind. Once you select the option you want, hit the Delete Comments button.
With that out of the way, you can go ahead and disable comments in WordPress altogether. Go to the Settings > Disable Comments tab. Inside, you’ll find a handful of settings. These are very similar to the last set of options, since you can either disable comments throughout your entire website, or only on specific types of content:
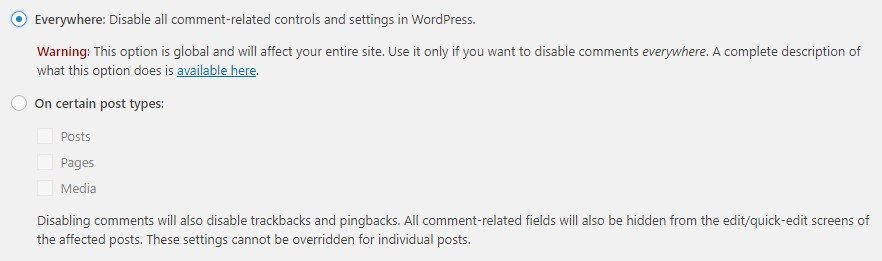
Once you’ve picked an option, select the Save Changes button. With that, you’re all set! Your website is now comments-free, and visitors won’t be able to leave new messages. Next, let’s talk about how to disable comments on WordPress manually.
2. Disable Comments and Delete Existing Messages Manually
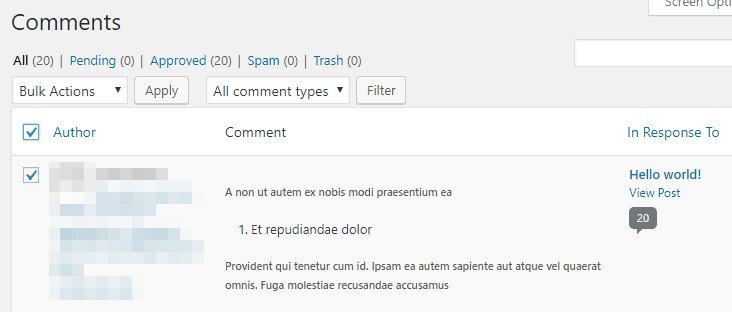
If you’d rather not add an extra plugin to your site, you can achieve almost exactly the same results manually. Just as before, you’ll need to delete existing comments so they will no longer show up. To do that, go to the Comments tab in WordPress. Then, mass-select all the comments on your site, using the checkbox next to where it says Author at the top of the page:
Then, open the Bulk Actions drop-down menu and select the Move to Trash option. This will send all the comments you selected to the trash, so they won’t show up on your posts and pages anymore:
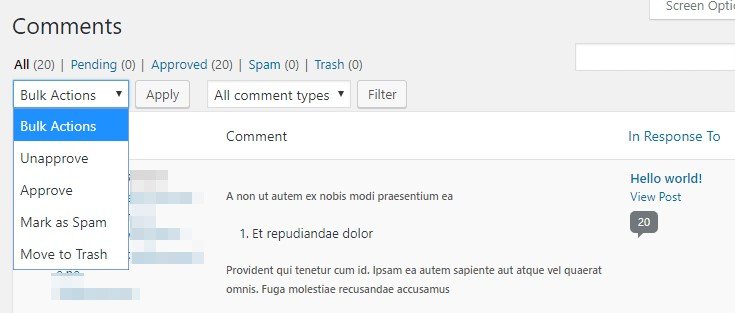
Depending on how many pages of comments you have, you may need to repeat this process several times until they’re all taken care of.
After that, you can move on to the next step, which is turning off comments altogether. You can do this from the Settings > Discussion tab in your dashboard. Near the top of the screen, you’ll see an option labeled Allow people to post comments on new articles:

This option should be turned on right now, so go ahead and un-check it. Then scroll down and hit the Save Changes button.
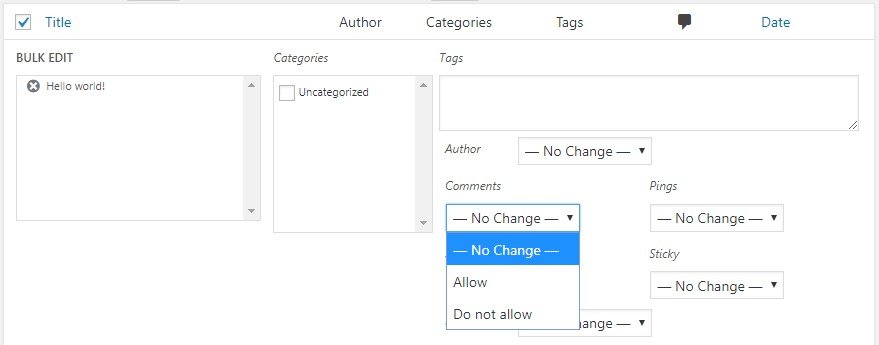
Unfortunately, this change will only take effect for new posts. This means users will still be able to post comments on older content. To stop that from happening, you’ll need to go to the All Posts tab and mass-select all your existing articles. Then, open up the Bulk Actions menu and choose the Edit option.
This will open the WordPress quick editor, which enables you to make simple changes to your posts’ settings in bulk. There’s a setting here labeled Comments, and if you click on it you’ll be able to choose the Do not allow option:
Just as when you deleted your comments, you may need to repeat this process several times (depending on how many posts you’ve published on your website). Just make your way through the backlog page by page, until you’ve disabled comments for all of them.
At this point, you’ve deleted and disabled comments for posts, but you’ll still have to deal with pages and media. The good news is that WordPress comments are turned off by default for pages. If you’ve enabled them on your site, however, you can still turn them off.
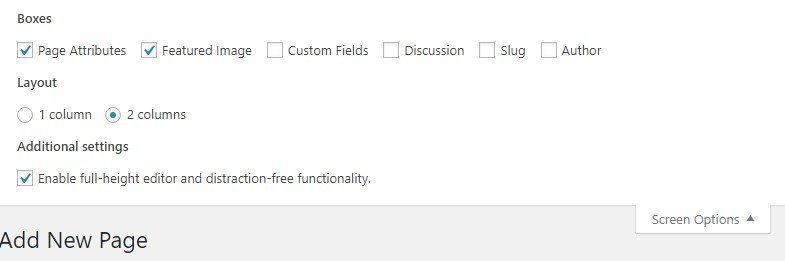
Open up the editor for a page, and look for the Discussion widget. Deselect the Allow comments option:

You’ll have to do this for every page you’ve enabled comments on. Then, select the Screen Options button at the top of the screen, and disable the Discussion setting:
This will prevent the option for enabling comments from even showing up on your pages in the future.
After that, all that’s left to worry about are comments on media files. Sadly, WordPress doesn’t include an option to turn those off by default. Therefore, you’ll need to do it for each file individually. Go to the Media Library tab and switch to the list view, which enables you to click on the Edit button under each image:
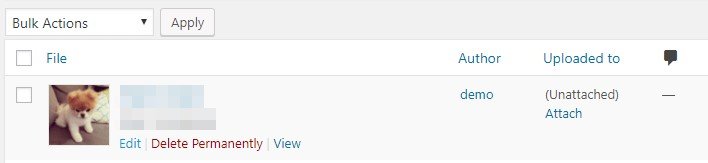
The image will open as if you were editing a post. There, you’ll be able to disable the Discussions widget under Screen Options, just as we described above for pages. You’ll have to do this for every single image in your library, if you want to prevent visitors from leaving comments on them. So if you need to disable comments on media files, you may be better off using the plugin solution.
Conclusion
WordPress comments can provide you with useful insight into what your visitors think about your content, as well as what they want to see in the future. However, not every type of website requires comments. If your site isn’t a blog, or if you want your content to remain evergreen, you might want to disable comments in WordPress altogether.
As is often the case with WordPress, you can accomplish this task is multiple ways. After backing up your site, you can either;
- Use the Disable Comments plugin.
- Disable comments and delete existing messages manually.
Do you have any questions about how to disable comments on WordPress? Ask away in the comments section below!