
Out of the box, WordPress can handle some basic email functionality. For example, the platform automatically sends you notifications when someone signs up to your website. However, sometimes your site will fail to send emails as it should, which gives you a potentially complex problem to fix.
WordPress uses PHP to send its emails, and while this method works in most cases, it’s also prone to the occasional error. The good news is you can fix the problem by integrating a third-party email solution into your website. This way, you can ensure your emails will always arrive on time.
In this article, we’ll talk about why you need a separate email solution for your WordPress website. Then we’ll teach you how to use a plugin to integrate SMTP into your site, and how to test it. Let’s get to work!
Why You Need a Third-Party Email Solution for WordPress
As we mentioned earlier, WordPress is perfectly capable of sending essential emails on its own. For example, when someone signs up to your website, they’ll receive a confirmation message that arrives almost instantly. The same goes for when your site updates to the latest version of the platform, among many other situations.
However, in some cases, WordPress’ built-in email feature might not work as intended. In other words, emails sent from your website might not arrive for anyone, including yourself. There are several reasons why this might happen, such as:
- Your host doesn’t support PHP emails. In some cases, your web host might not be configured to support emails sent via PHP, so your messages will never even leave the nest.
- Your emails are categorized as spam. Sometimes, email service providers will classify emails sent from WordPress websites as spam.
- Compatibility issues with your server’s software. Using an outdated version of PHP, for example, can cause its email function to misbehave.
To be clear, running into problems with WordPress’ built-in email functionality is somewhat rare if you’re using a reputable host. However, there are plenty of other reasons why it still makes sense to integrate your website with a third-party email solution.
Most modern email platforms enable you to do a lot beyond sending simple confirmation emails. For example, platforms such as MailChimp and SendinBlue provide you with the tools you need to create full-fledged email campaigns. This includes creating email lists, scheduling massive campaigns and even messaging thousand of people at once. Perhaps most importantly, modern email platforms often include analytics tools, which enable you to track your email’s performance.
To sum it up, it makes sense to integrate a third-party email platform if you want to avoid issues with messages that never arrive. However, doing so also opens up an entire world of possibilities when it comes to email marketing. These platforms tend to use Simple Mail Transfer Protocol (SMTP), which is a more widely-adopted alternative to a PHP solution.
The only downside to using SMTP is that platforms using this protocol tend to charge for it. Still, setting up an SMTP server isn’t usually expensive, and if you use a full-fledged email marketing platform, the benefits typically outweigh the costs. In the next section, we’ll introduce you to one service that offers a free SMTP server with a few limitations, which is perfect for small to medium websites.
How to Configure Your WordPress Email Settings to Send Messages Over SMTP (In 4 Steps)
There are plenty of services you can use to set up an SMTP server you can integrate with WordPress. However, for this tutorial, we opted for a platform that’s both easy to use and relatively cheap – SendinBlue, which we’ll talk about more in the second step.
Step #1: Check If Your WordPress Send Email Function Is Working Correctly
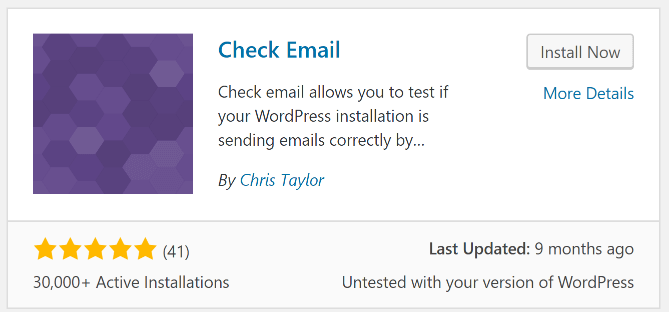
As we mentioned earlier, it makes sense to configure WordPress to use SMTP even if your website doesn’t have any current issues sending email. However, it still doesn’t hurt to check if things are working as they should before you make the leap. The easiest way to find out if your website is sending emails as it should is using a plugin such as Check Email.
This particular plugin hasn’t been updated for a while, but its core functionality is simple, so shouldn’t give you any problems. To install it, go to the Plugins > Add New tab on your WordPress dashboard and use the search bar to the right to find the Check Email plugin. If you type its full name, the plugin should show up as the first result:
Click on the Install Now button and wait until it turns into one reading Activate, then hit it again. When it’s finished, you can use the plugin by going to the Tools > Check Email tab. Inside, you’ll find information about your current WordPress email settings and the option to send a test message to any address you want:

Choose which address you want to send the test email to and click on the Send test email button at the bottom of the page. You’ll see a success message appear now, showing that it’s been sent. However, you’ll need to check the address you entered manually to verify it arrived correctly:
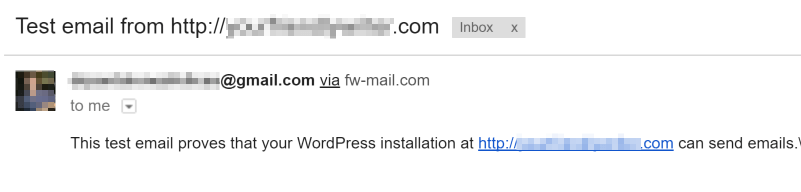
In our case, the email arrived without any issues through our 000Webhost WordPress website. However, we’re still going to go ahead and configure our site to use SMTP to cover our bases.
Step #2: Set Up Your Own SMTP Server
SendinBlue is a popular email marketing platform that enables you to design and program sophisticated email campaigns. It provides you with analytics for performance monitoring, and plenty of other advanced features you might want to use down the road. For now, suffice it to say the platform offers a free account option that supports up to 9,000 emails per month for unlimited recipients:

If you’re a running a small to a medium website with a few hundred email subscribers (which is already plenty), the plan should be enough to tide you over month-to-month. You can (of course) always upgrade to a more powerful option, but in any case, we recommend using the free plan for this tutorial. That way, you’ll get an idea of how the process of configuring WordPress to work with an SMTP server goes. First off, click on the Sign Up for Free button at the top right of the platform’s website:

You don’t need to link a credit card to sign up for a basic SendinBlue plan, so fill out the information the platform asks of you and wait for a confirmation email. After you click the link in this email, you’ll be sent to your SendinBlue dashboard. You can fill out your profile here, noting the SendinBlue Use Cases section, where you should specify you intend to use the platform to send transactional emails:

After you fill out your profile information, SendinBlue will send you an SMS to the number you provided, as a way to prove you’re a real user. Keep in mind this step is obligatory if you want to start using your SMTP server right away!
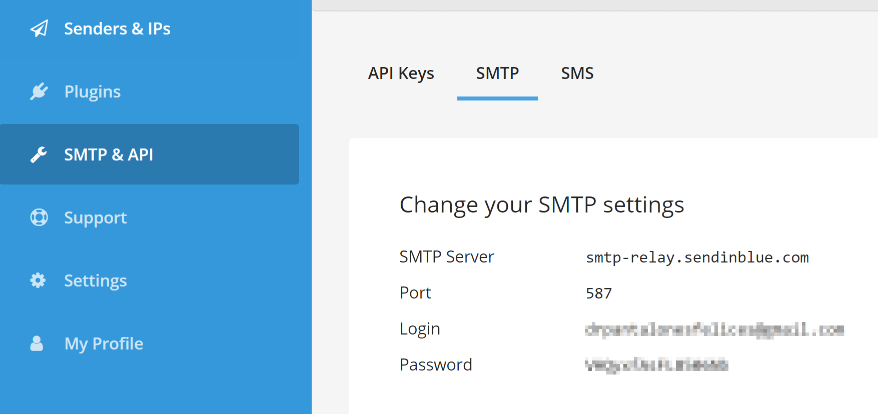
Afterward, you can hop over to the SMTP & API tab on your dashboard, then click on the SMTP tab on the next page. You’ll find the credentials you need at the top of the screen:
Keep this tab open for now, open your WordPress dashboard in a fresh one, then move onto the next step.
Step #3: Install and Configure the WP Mail SMTP Plugin
Our free SMTP server is now up and ready to work! The next step is to find a way to tell WordPress to use it to send emails by default. As you might expect, the easiest way to do it is through a WordPress SMTP plugin and in this case, we’re going to use WP Mail SMTP:

This particular tool shines because it’s easy to configure and it includes a built-in email testing function. After we finish configuring WordPress to use your new SMTP server, we’ll use the plugin to test everything’s working correctly. For now, install and activate the plugin following the same process as the first step. Afterward, jump to the Settings > WP Mail SMTP page within WordPress. The first two settings you’ll want to configure are the email from which your website’s emails will be sent, and the name you’ll use:

Next, you get to choose which SMTP service provider you’re using. SendinBlue doesn’t appear among the plugin’s default settings, but you can still use it by choosing the Other SMTP option:

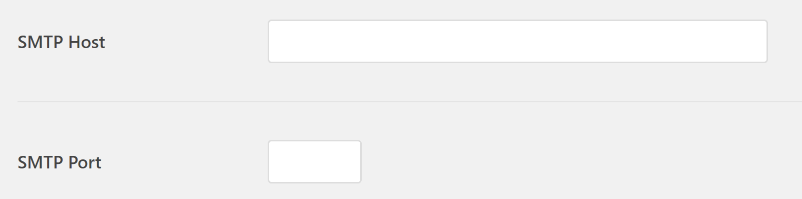
Scroll down to the Other SMTP section, where you’ll see two fields called SMTP Host and SMTP Port. In this case, you’d use smtp-relay.sendinblue.com as the SMTP Host, although your port may vary depending on your provider:
Remember, you can find the exact information you need to type in here on your SendinBlue dashboard. More specifically, on the SMTP tab you left open earlier. Further down, under Encryption, we recommend choosing TSL since it’s the default most providers use these days:

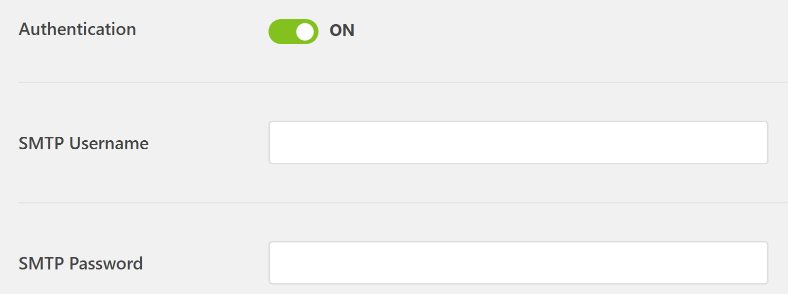
Finally, look for the Authentication option at the bottom of the page and enable it. The plugin will now ask for your SMTP Username and SMTP Password, which you can also find on your SendinBlue dashboard:
After you’ve filled in all the required fields, click on the Save Settings button at the bottom of the page. You should see a success message appear at the top of the screen, but we still need to run a couple of tests to check if the integration went off without a hitch.
Step #4: Send a Test Email Using WordPress
To test if your new SMTP server is working correctly, go to the Email Test tab within WordPress under Settings > WP Mail SMTP. Inside, you’ll find a single field where you can enter any email address you want to send a test email to:
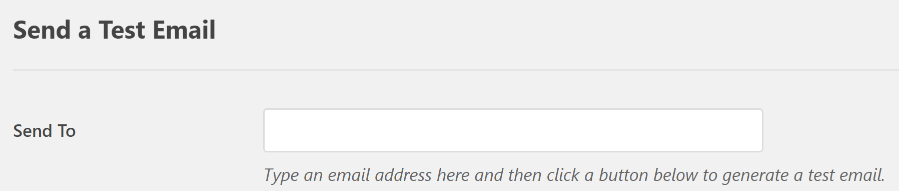
Go ahead, type an email address you can check right away and click on Send Email. The plugin should take a couple of seconds now to generate the email, and if everything’s working correctly, you’ll see a success message.
Remember – your SMTP server won’t work correctly until you fill out your SendinBlue profile and confirm your account via SMS, as we mentioned earlier. If you skipped that step, you’ll see an error message much like this one:

In this case, you’ll need to either go back and fill out your profile or contact SendinBlue directly to check out if there’s a reason why your account is still pending activation. It can be a hassle, but these steps prevent email spammers from abusing email marketing services.
2 Free SMTP Email Service Alternatives You Can Use
SendinBlue is one of our top picks for budget SMTP mailing. However, it’s not the only option available to you. Other notable options include SendGrid, which also enables you to compose and design sophisticated email campaigns. Moreover, you can try out the platform’s Essentials plan for free, for up to 30 days, which enables you to send up to 40,000 emails per month:
 If you’re looking for a free plan, SendGrid enables you to send up to 100 messages per day at no cost, and it supports up 2,000 contacts. On the other hand, if you find 100 emails per day too limiting, you can always try out Mailgun. Unlike our other suggestions, Mailgun focuses entirely on guaranteeing high email deliverability, and it offers very few campaign design options. However, it enables you to send up to 10,000 free emails per month, which is more than any of the other options we’ve covered so far:

In any case, the WP Mail SMTP plugin supports all of the platforms we’ve covered so far, and their configuration processes are very similar. This means you can use whichever service you feel more comfortable with.
Conclusion
Out of the box, WordPress can handle all the basic email requirements your website might need. It can submit critical messages, such as account confirmation emails automatically. However, sometimes WordPress may fail to deliver emails as it should and in that case, you might need to look for a third-party SMTP server.
It sounds complicated, but configuring WordPress to use SMTP only takes three simple steps:
- Set up your own SMTP server using a platform such as SendinBlue.
- Install and configure a WordPress SMTP plugin such as WP Mail SMTP.
- Send a test email to ensure the plugin is configured properly.
Do you have any questions about how to send WordPress emails using SMTP? Let’s talk about them in the comments section below!