April 25, 2024
WordPress Tutorial
WordPress is an online, open-source content management system (CMS) based on PHP and MySQL. Starting as a blogging platform, WordPress has become the most popular CMS globally, powering over 40% of all websites and dominating the CMS market with a 60% share.
In this WordPress tutorial, you will find everything you need to get started. From installation to backups – we have the resources for you to learn what WordPress is and how to use it.
Be sure to check out our newest WordPress tutorials at the end of this article.
WordPress Basics
WordPress, as a content management system, is an application for creating, modifying, and publishing digital content – individually or as a team. In addition, WordPress supports various text formatting, images, videos, and custom code, making it possible to create comprehensive and appealing content.
There are two types of WordPress – the self-hosted WordPress.org and the hosted WordPress.com.
What varies between these two platforms is the host. Using the self-hosted WordPress.org, you can download the WordPress software and host it on a managed WordPress hosting such as Hostinger.
On the other hand, WordPress.com is a hosted solution that lets you create a WordPress site for free. However, it is a less flexible solution, and ads are shown on the site unless you purchase a paid plan.
This WordPress tutorial will focus on the self-hosted version.
Installing WordPress
The first step is to choose web hosting. There are plenty of providers and hosting plans available, but you should look for one that fulfills the following WordPress system requirements:
- PHP version 7.4 or greater
- MySQL version 8.0 or greater OR MariaDB version 10.4 or greater
- HTTPS support
Most web hosts nowadays support all of these. Plus, auto-installers are often available to make the installation process and launching a WordPress website easier.
Pro Tip
Before proceeding with WordPress installation, you need to decide on how to access your website, whether via your domain name root (example.com), subdirectory (example.com/blog), or subdomain name (blog.example.com).
If you want to set up WordPress on a subdomain name, you will have to take an additional step and create a subdomain name. On Hostinger, this can be easily done via hPanel.
Here are some ways to install WordPress:
- Using hPanel Auto-Installer. When you set up a Hostinger hosting plan, you can use the onboarding wizard to set up WordPress. Alternatively, use hPanel’s auto-installer.
- Using Hostinger VPS template. If you have a VPS plan, Hostinger’s VPS template can help you easily set up WordPress and the server operating system without using the command line.
- Installing WordPress manually. As an alternative, install WordPress manually by downloading the files from WordPress.org and extracting them to the public_html directory. Note that you will have to manually set up a WordPress database for the website.
Installing WordPress Themes
WordPress themes affect the appearance and certain functions of your WordPress site. While some are multipurpose and can be used on any website, others are purpose-built and feature templates for eCommerce or portfolio websites, for example.
To install a WordPress theme, access the Appearance section, click the Add New Theme button, and search for the best free WordPress themes. You can even filter themes by features and colors.
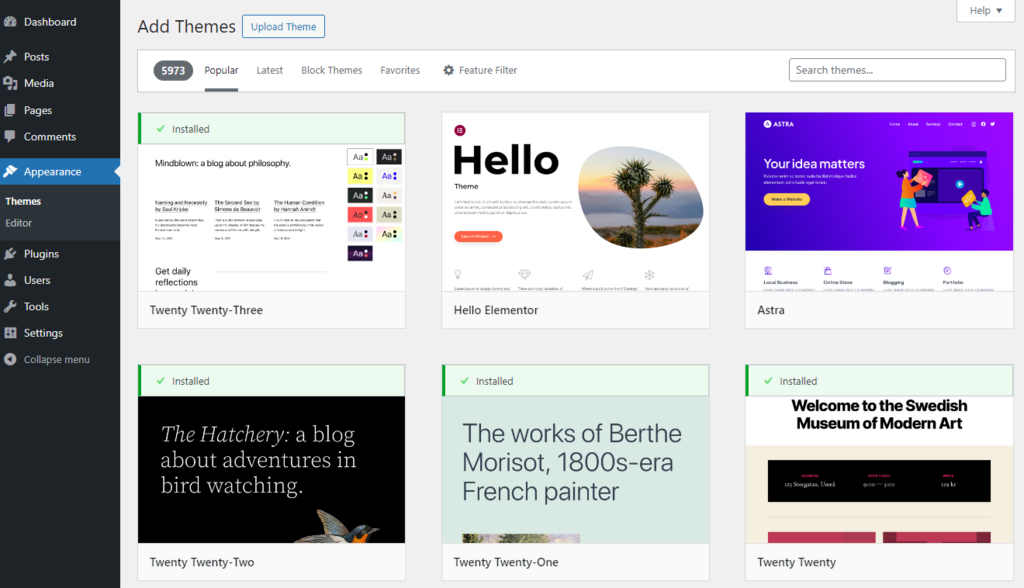
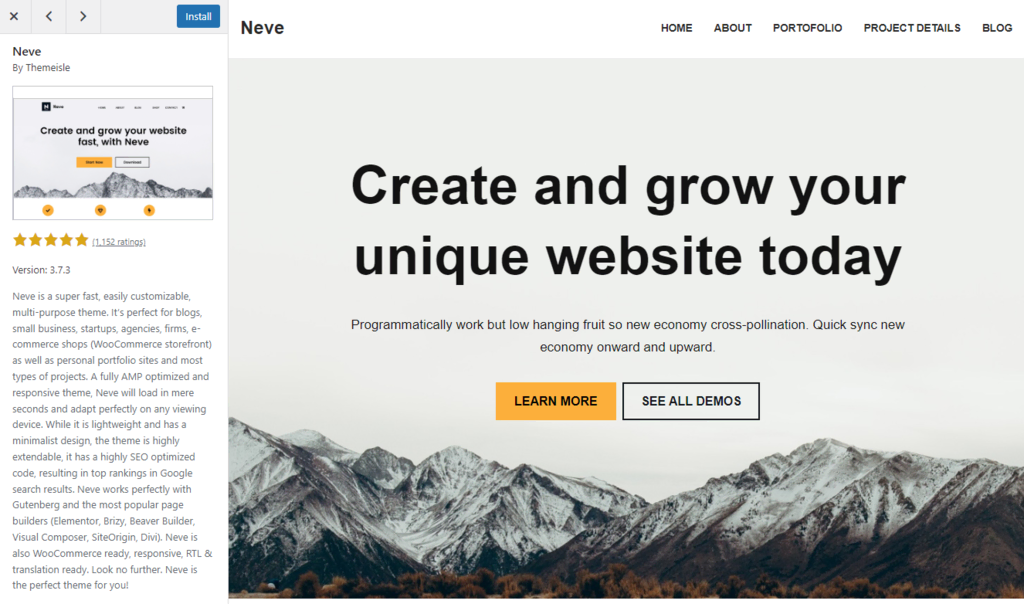
The preview feature lets you see how the website will look using the selected theme. This can prevent you from installing multiple themes just to find which one fits your needs. Once you decide, click Install and then Activate the theme.
If you purchased a premium theme from a third-party platform, you must manually upload the theme files.
Access the same Appearance section, press the Upload Theme button, and select the theme’s .zip file. It can take up to a few minutes for the uploading process to complete. Once it’s done, Activate the theme.
Installing WordPress Plugins
WordPress plugins let you add new features to a WordPress site without any coding. There are thousands of free and paid plugins built for different purposes – from social media sharing to site security.
If you want some recommendations, here is our list of the best WordPress plugins.
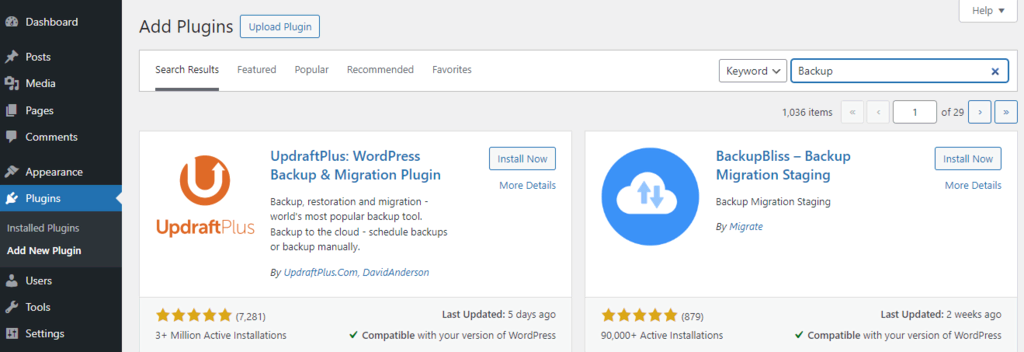
To install a WordPress plugin, go to Plugins → Add New Plugin and enter its name in the search feature. Hit the Install Now button and then Activate the plugin.
Note that there are premium WordPress plugins that cannot be installed from the official WordPress plugin directory. If you purchased a premium plugin from a third-party marketplace, you must manually upload it to WordPress.
To install a premium plugin, click the Upload Plugin. Select a plugin archive file to upload and install. Once it’s done, activate the plugin.
But remember – it’s not recommended to install too many plugins, as they can have a huge impact on the site’s performance. Install only the essentials and delete any you are not using.
Publishing Content
Creating a WordPress website involves publishing a new post or page. Pages are mainly used for static, undated content – Contact Us or About are good examples of pages.
On the other hand, WordPress posts are used to publish time-sensitive content and can be categorized, tagged, and archived.
Creating a New Post
To create a new WordPress post, navigate to Posts → Add New Post from the dashboard’s left sidebar or choose the New → Post option on the top toolbar.
You will be presented with an editing screen with various posting features. The first step is entering a title for your blog post.
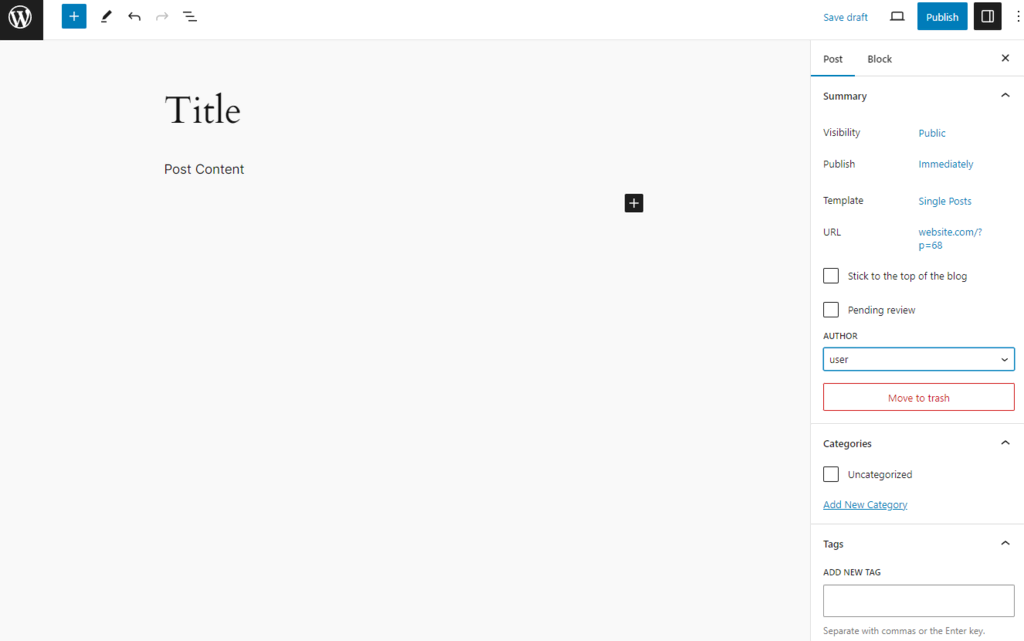
Next, enter the actual content of the blog post using WordPress blocks. If you want to format the text, use the block toolbar options.
The post settings panel is on the right side of the screen, with each section serving a particular function:
- Post Summary. Change the status and visibility of the post and schedule it. To make the blog post sticky, select the Stick to the top of the blog option.
- Categories. In this box, you can add, delete, or edit the post category.
- Tags. This box helps you to add new tags quickly.
- Featured Image. You can assign a featured image, which will be visible at the top of the post.
To publish the post, click the Publish button at the top-right corner of the editor screen.
Creating a New Page
Creating a new page involves the same block editor. Thus, the process of text input and formatting is similar to creating a post. To create a new WordPress page, click Pages → Add New.
The Pages menu does not have Tags and Categories options. Instead, it has a section called Page Attributes.
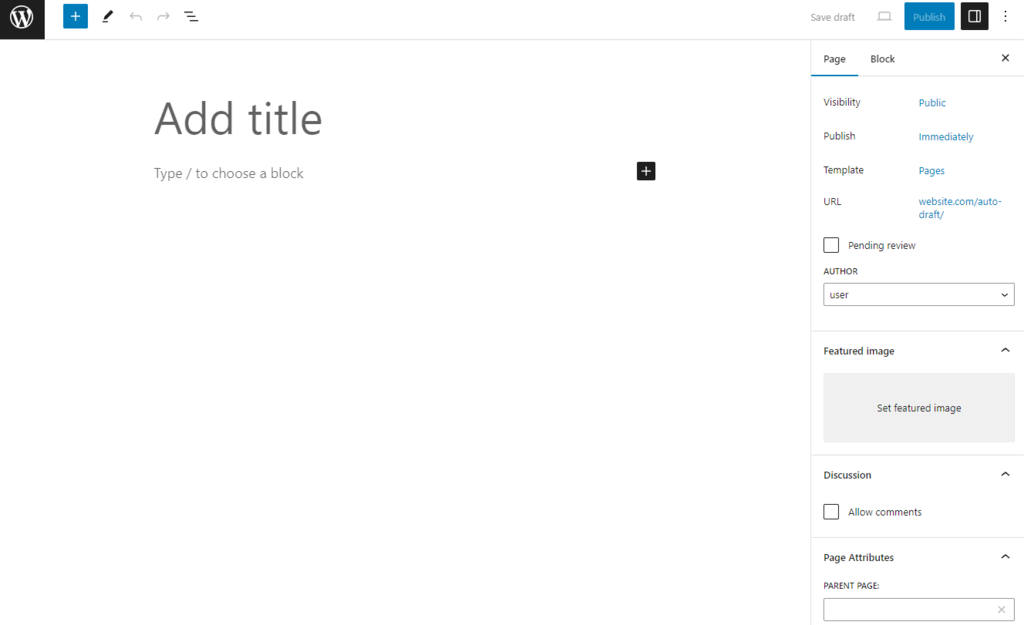
In this section, you can change the order of the pages and set parent pages.
Suggested Reading
WordPress uses a block editor for content creation. New users may need to familiarize themselves with the interface and features to maximize the potential. Read the following resources to speed up your progress:
WordPress Gutenberg: What It Is and How to Use It
Optimizing WordPress Performance
As your WordPress website grows, so does its number of text, images, code, and other media files. A bigger website takes a longer time to load.
To avoid this, you should invest some time in WordPress optimization. It will ensure that your pages load quickly and efficiently, and is also useful for WordPress SEO.
WordPress optimization is relatively easy, thanks to the number of plugins and other tools available.
Optimizing WordPress Images
Image optimization is another crucial task to make your WordPress site fast. Generally, two main issues can cause images to load slowly:
- Using images that are too large. An overly large image causes redundant load times.
- Images are not fully compressed. High-quality images take up more space. In most cases, you can compress them to reduce the file size while maintaining an acceptable level of quality.
If you don’t need high-resolution images on your website, resize them before uploading to WordPress – you can also use an image optimization plugin to compress them.
Enabling GZIP Compression for WordPress
Enabling GZIP compression for a WordPress website is a great way to increase speed and performance. In short, it works by finding similar strings in a text file and replacing them temporarily, resulting in a smaller file size.
HTML and CSS files have a lot of repetitive text and spaces, making GZIP compression very effective. Overall, it can reduce the size of a WordPress page by up to 50-70%.
What you should remember is that GZIP compression may slightly increase CPU usage. If that is not an issue, it is a great way to optimize your WordPress site.
Using a Content Delivery Network
Setting up a content delivery network (CDN) will speed up WordPress by caching content in multiple data centers worldwide.
Once a visitor enters your site, the content will be delivered by the nearest data center, resulting in a better front-end experience.
Hostinger offers a built-in CDN on select hosting plans with servers available in six countries, including the United States, France, Brazil, and India. You can easily activate it from hPanel, and it can improve your website performance by 40%.
CDNs also work great with WordPress caching plugins, and there are free tools to get you started.
Using WordPress Caching Plugins
WordPress caching plugins create and deliver a static version of your website instead of loading all PHP scripts every time someone refreshes or re-enters your site.
For example, when you access a frequently visited site, your browser will have a portion of its static content in its cache.
As a result, the browser must request fewer files and information from the server, ultimately leading to quicker loading.
Here are some of the most popular WordPress caching plugins:
Suggested Reading
WordPress cache plugin needs to be configured correctly to work effectively. Read our detailed tutorial on setting up LiteSpeed Cache on a WordPress site.
Enabling Lazy Loading
Generally, when a web page is opened, all the content is loaded instantly. Using WordPress lazy loading, it is possible to delay the initialization of some objects until they are needed.
The most common practice is displaying images only when they are visible from the visitor’s viewpoint.
All you need to do in order to take advantage of this technique is to install and enable a plugin such as LazyLoad.
Deferring JavaScript Parsing in WordPress
Most themes, plugins, and social media add-ons use a lot of JavaScript, which is, by default, loaded first when accessing a site. This will make HTML and other visual content appear only after loading JavaScript.
You can defer JavaScript parsing in WordPress so that the visual elements appear faster, while other content that uses JavaScript will be loaded afterward.
Keeping WordPress Secure
As millions of websites use WordPress, it has become a popular target for attackers.
However, there are quite a few measures you can take to protect your site against hacking and other malicious activity.
Keeping WordPress Updated
One of the most important factors in securing your site is using the latest WordPress version and always updating themes and plugins.
Most updates include security tweaks and vulnerability fixes, protecting sites from potential exploitations. A common practice among hackers is taking advantage of sites running an outdated WordPress version with a known vulnerability.
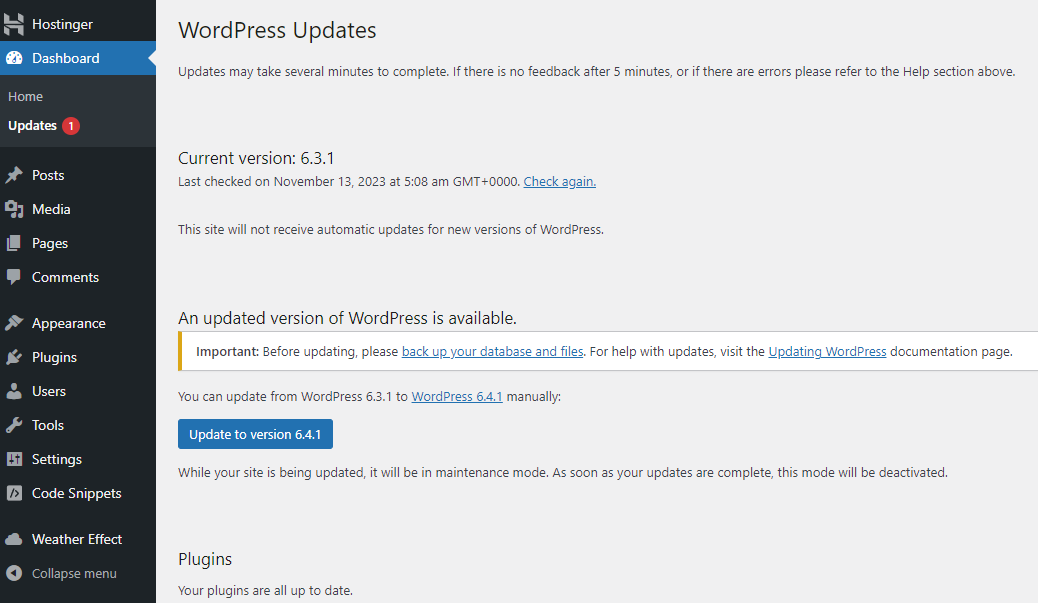
In some cases, the website is updated automatically upon the release of a new version of WordPress. However, it may not always work, or the feature may be turned off on some hosts to prevent unwanted errors.
When a new WordPress version arrives, a notification will be shown at the top of your WordPress dashboard. You may also update your themes and plugins by going to Dashboard → Updates.
Backing Up WordPress
Generating WordPress backups is a crucial task. It will increase security and provide a reliable way of restoring your site in case of unexpected errors or issues.
You can perform a backup manually or use automation tools. The manual process involves downloading the files and the MySQL database of the WordPress site.
However, if you make many new WordPress posts and changes or manage several different websites, downloading everything manually can be a hassle.
In addition, most hosting providers offer automated account backups. As an extra security measure, you can use WordPress plugins to automate monthly, weekly, or even daily backups.
They will save you lots of time and allow you to store the backup WordPress files and database in a remote location.
Using Unique Usernames and Passwords
While admin is the username set by default in all WordPress installations, keeping it can make your site highly vulnerable. Change it to add an extra layer of security to your login credentials.
Also, when setting up a password, include numbers, capital letters, and special symbols. If you are having difficulties keeping track of all of them, you can use tools such as 1Password to store them.
It will save the trouble of remembering all the different passwords and help you adhere to password difficulty requirements.
Learn More About Site Security
Debug WordPress
Sometimes, you’ll encounter errors in WordPress and have to troubleshoot them yourself. These can range from HTML error codes to the white screen of death.
When these errors occur, you’ll have to debug WordPress. Debugging means identifying and removing bugs or errors in your WordPress installation.
To make it easier, these are some steps to follow:
- Enable WP-DEBUG. WP-DEBUG is a native WordPress feature that identifies the root cause of any error. It is sometimes disabled as it can show where the error lies to all visitors. But if done correctly, WP-DEBUG should safely help you identify the error.
- Enable PHP error logging. As WordPress runs on PHP, you should enable PHP error logging to make tracking any error that has occurred easier.
- Use a staging tool. When tweaking code in your WordPress site, it’s recommended to use a staging site. Thus, when an error happens, you can troubleshoot the code without affecting the live site.
Migrate to WordPress
If you have a website on a different platform and want to move it to WordPress, there are several options to migrate it:
- Use WordPress importer. WordPress has a native importer tool that allows you to import a website from other blogging platforms.
- Use WordPress importer plugins. If the native importer tool doesn’t support the platform you currently use, look for WordPress importer plugins.
- Use Hostinger’s free migration service. If you host your WordPress site on another hosting provider, we’ll take care of the migration process for you.
Suggested Reading
Learn more about migrating websites with these helpful WordPress tutorials:
How to Migrate WordPress to a New Host
How to Migrate Wix to WordPress
How to Migrate Squarespace to WordPress
How to Migrate Blogger to WordPress
Becoming a WordPress Developer
With WordPress dominating the content management system landscape, there’s a constant demand for skilled developers to assist users in building and scaling their websites.
As a WordPress developer, you can either turn your expertise into a profitable business or share your knowledge freely with the community. Either way, there is some important knowledge to gain to become a WordPress developer:
- HTML. It is the fundamental building block of all web pages, including WordPress sites. It defines the structure and content of a web page, such as headings, paragraphs, images, and links.
- CSS. It is the basis for styling and presenting web pages. It controls the layout, colors, fonts, and other visual aspects of a website.
- PHP. As the server-side scripting language that powers WordPress, it is essential for creating dynamic and interactive web pages and developing custom WordPress themes, plugins, and functionality.
- MySQL. WordPress uses this database management system to store data, such as posts, pages, users, and settings. A basic understanding of MySQL will allow you to troubleshoot database issues, optimize WordPress performance, and extend the functionality of WordPress using custom plugins.
- REST API. A powerful tool that allows developers to interact with WordPress data from external applications. It is used to create mobile apps, integrate with other websites, and extend WordPress’ functionality in various ways.
- JavaScript. A client-side scripting language that adds interactivity and dynamic behavior to web pages, including WordPress sites. It creates animations, form validation, and user interactions.
- AJAX. A technique that allows JavaScript to make asynchronous requests to a server without reloading the entire page. This creates more responsive and user-friendly web applications, including WordPress websites.
Latest WordPress Tutorials
In this WordPress tutorial, we have discussed the basics of WordPress, how to install themes and plugins, and other tasks that will help your website perform well. If you want to learn even more about WordPress, check the list of our newest WordPress tutorials below.