
One of the most critical aspects of running a modern website is ensuring it always loads as quickly as possible. Statistics say that people are very impatient when it comes to loading times, so you need to be proactive when it comes to optimizing your website.
There are a lot of things you can do to keep loading times lean, and one of them is learning how to deal with render-blocking JavaScript and CSS in above-the-fold content. If you’re not sure what that is, don’t worry – by the time you’re done reading this guide, everything will be entirely clear. Plus, your website will shave off some of its loading times to boot.
In this guide, we’re going to talk about what JavaScript and CSS are. Then we’ll teach you how to eliminate render-blocking JavaScript and CSS in above-the-fold content for WordPress in two different ways. Let’s get to work!
What ‘Render-Blocking’ JavaScript and CSS Are
Before we go any further, there are a lot of terms we need to clarify for your benefit. Regardless of whether you’re a beginner or expert, you may not be familiar with some of them, so let’s take a minute to introduce the terms we’ll use throughout the piece:
- JavaScript. This is a programming language you can use to add advanced functionality to your website. Most WordPress plugins and themes use JavaScript, which means they add some extra code to your site to make things work.
- Cascading Stylesheets (CSS). If you want to add complex styles to your website, you’re going to need to use CSS. Every site uses HTML as its foundation, so to speak, and you can think about CSS as the wallpaper and paint.
- Render-blocking. This term refers to elements that prevent your pages from loading or ‘rendering’ as quickly as possible in your visitors’ browsers. In other words, any extra JavaScript or CSS you add to your website is considered render-blocking.
- Above-the-fold content. When you load a website using any browser, you can only see part of it at first. To check out the entire thing, you need to scroll down until the end. The part of the page you can see as soon as it’s done loading is what we call above-the-fold content.
Now you know what each piece of the puzzle means, the concept shouldn’t be as complicated. When we talk about eliminating render-blocking JavaScript and CSS in above-the-fold content, we’re referring to the process of optimizing your website so those scripts and files don’t affect its loading times.
The faster your website loads, the better the experience will be for your visitors. People don’t have much patience when it comes to slow websites, and a site that crawls along can drive visitors away out of frustration, which can be a killer blow.
To be clear, there are a lot of things you can do to optimize your website’s loading times. However, eliminating render-blocking JavaScript and CSS in above-the-fold content can be particularly tricky, hence why you might need some help. Before we get to work, let’s talk about how to monitor your website’s performance in the first place.
How to Monitor Your Website’s Performance
When it comes to your website’s performance, there are plenty of tools you can use to tell you exactly how long your pages take to load. GTmetrix, for example, provides you with thorough speed test results. You simply tell the service which URL to analyze, and it’ll return a report in seconds:

To the left of the screen, you’ll see two scores GTmetrix gives your site depending on how well-optimized it is. The website in that example could use a bit of work, and you can learn about how to optimize it if you scroll down to the PageSpeed tab:

For now, we’re going to focus only on your overall loading time, and less than two seconds is a good target. However, there’s always some gains to be made, even if you’re below that mark. For more actionable advice on how to optimize your website, check out Google PageSpeed Insights:

Unlike GTmetrix, this tool simply assigns your site two scores, for both mobile and browser experiences:
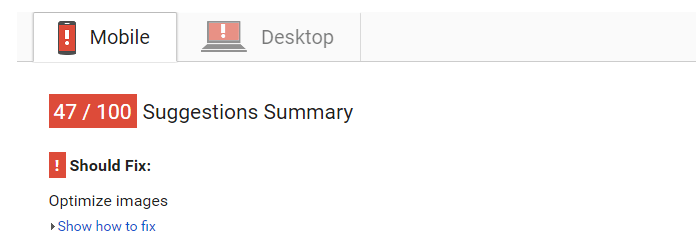
Right below your score, there’s a section called Should Fix. If there’s any JavaScript or CSS that’s preventing your website from loading quickly, you’ll see a message such as this one:

Clicking on the Show how to fix button will tell you exactly which scripts are behind your problems. Once you have that information, you can get to work on eliminating them.
How to Eliminate Render-Blocking JavaScript and CSS in Above-the-Fold Content for WordPress (In 2 Ways)
Before we get to work, it’s worth nothing that we’re not going to eliminate your website’s scripts. Instead, we’re going to find ways to prevent your JavaScript and CSS from slowing down your site without taking away its functionality. Let’s start with the simplest method.
1. Use the Autoptimize Plugin
When it comes to WordPress, there almost always a plugin to fix practically any issue. For our needs, the Autoptimize plugin is what we’re after. It simply enables you to lessen the impact your website’s scripts have on its loading times:

To do this, the plugin works a lot of magic behind the scenes. For example, it combines the code of those scripts when possible, so visitors don’t have to load as many files. It also ‘minifies’ their code, which involves removing all the empty characters from it, including line breaks, tabs, and carriage returns. While the code becomes difficult to read, it can reduce the file’s size, resulting in faster page loading times.
Aside from that, the plugin also takes your JavaScript and CSS and ‘defers’ them. This means code will only load after your page renders above the fold for your visitors. In practice, this doesn’t affect your site’s functionality, but it can improve its performance.
To install the plugin, go to your WordPress dashboard and into the Plugins tab. Now click on the Add New button near the top of the window. On the next screen, you’ll see a search bar where you should type in Autoptimize, then wait for the plugin to pop up in the results below. Go ahead and click on the Install Now button next to the plugin’s name:

After the installation is over, a blue Activate button will show up next to the plugin’s name. Click on that button, and now you can go to the new Settings > Autoptimize tab on your dashboard:

You’ll find a handful of settings within, but the two we care about are Optimize JavaScript Code? and Optimize CSS Code?:
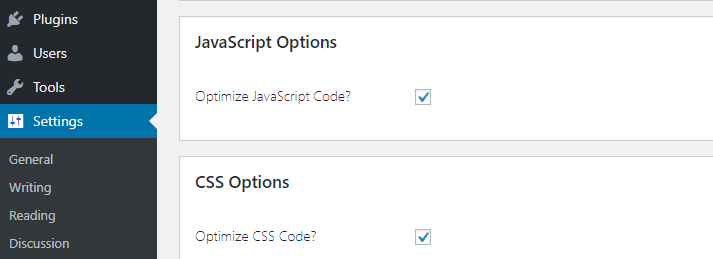
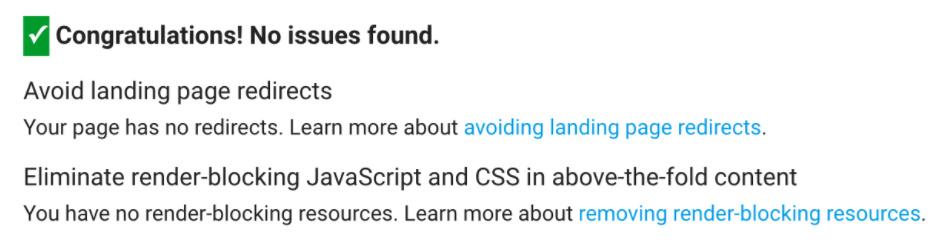
Enable both settings now and save your changes. In most cases, this should be enough to take care of any render-blocking JavaScript or CSS in your website. However, it doesn’t hurt to double-check, so return to Google PageSpeed Insights and analyze your website once more. If the plugin took care of all the guilty scripts, you shouldn’t see any messages about render-blocking JavaScript and CSS under the Should Fix section:
However, it may be the case that the plugin wasn’t able to eliminate every single script with just the default settings. If your website falls into that category, return to the Settings > Autoptimize tab and click on the Show Advanced Settings button near the top of the screen. Now, enable the two options that read Also Aggregate Inline JS and Also Aggregate Inline CSS and save your changes. That should be enough to eliminate all the offending scripts from your website. If not, you’ll need to use a more thorough plugin.
2. Use the W3 Total Cache Plugin
An alternative to Autoptimize is the W3 Total Cache plugin. It’s a comprehensive, all-in-one solution for WordPress caching and optimization:
For the uninitiated, ‘caching’ stores some of its files on your visitors’ computers. Doing so means they won’t have to load as much data on subsequent visits, which improves loading times.
On top of being an excellent caching plugin, W3 Total Cache can also help us eliminate render-blocking JavaScript and CSS in above-the-fold content. To do it, install the plugin using the same steps from the first method.
Eliminate Render-Blocking JavaScript
Once the plugin is ready to use, go to the Performance > General Settings tab within WordPress. Inside, find the Minify section, tick the Enabled setting and choose the Manual mode:
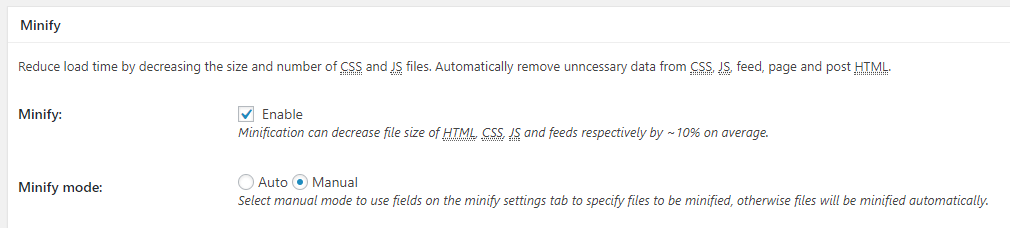
Remember to save your new settings, then go to Performance > Minify and look for the JS section. Now choose the Non-blocking using “defer” setting for both the Before </head> and After <body> settings:

Moving on, look down to the JS file management section and make sure you select your active theme, then click on the Add a Script button right below:

To complete this section, you’ll need to return to Google PageSpeed Insights and run another website analysis. When you get your results back, scroll down to the Should Fix section and click on the Show how to fix button right below. Doing so will display a list of your website’s render-blocking JavaScript and CSS files:

Now, copy the full URL for each of the JavaScript files and paste it in the field that showed up after you clicked on the Add a Script button in your dashboard:

Leave the default Template and Embed Location settings and repeat the process for each JavaScript file Google points you towards. When you’re done, click the Save all settings button, and that’s it!
Eliminate Render-Blocking CSS
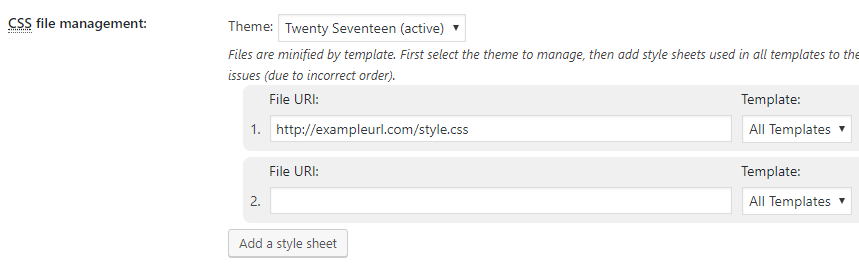
Now it’s time to take care of your render-blocking CSS using a similar process. Just scroll down to the CSS file management section and choose your active theme from the list to the right:

Now, you’re going to repeat the same process you used with your JavaScript, which is as follows:
- Click on the Add a style sheet button below the dropdown list indicating your active theme.
- Return to your Google PageSpeed Insights results and locate the list of render-blocking CSS files in your page.
- Copy one of the files’ URL and paste it into the File URL field that popped up after clicking on the Add a style sheet button.
- Make sure your Template settings are set to All Templates.
- Click on the Add a style sheet button again and repeat the process for as many CSS files as you have to.
When you’re done, you should have a list of files that looks something like this:
Now, remember to save your changes by clicking on the Save all settings button. Afterward, test your website again using Google PageSpeed Insights. If you did everything right, there shouldn’t be any more render-blocking scripts left on your page. Eliminating those scripts should’ve given you a boost to your Google PageSpeed Insights score. If you want to check out exactly how this affected your loading times, return to GTMetrix and run a new test. Your loading times should be lower than during the test you ran near the beginning of this guide, so pat yourself on the back!
Conclusion
Optimizing your website for better loading times requires a bit of work, but the rewards are well worth it. Doing so will make navigating your site easier, and your visitors should enjoy their experience even more. When you talk about how to eliminate render-blocking JavaScript and CSS in above-the-fold content, it sounds complicated. However, as you just learned, it’s a very straightforward process.
Let’s recap the two easiest ways to fix this issue in WordPress:
- Use the Autoptimize plugin.
- Use the W3 Total Cache plugin.
Do you have any questions about how to eliminate render-blocking JavaScript and CSS in above-the-fold content for WordPress? Ask away in the comments section below!