
The WordPress ‘White Screen of Death’ (WSoD) is simultaneously one of the platform’s most troublesome errors, and the one with the scariest name. This error in particular can have multiple causes, and the lack of detail it provides you makes it difficult – but not impossible – to troubleshoot.
The best approach to solve the error is to narrow down the most probable causes and tackle them in turn. Fortunately, the WordPress community is so large, there are details on (and advice for how to solve) practically every common error and issue. This means fixing the WordPress White Screen of Death is well within your capabilities and reach.
In this article, we’re going to explain what this error is and what its top causes are. Then we’ll guide you through six ways to fix the WSoD, and discuss what to do if it keeps popping up. Let’s get to work!
What the WordPress White Screen of Death Is (And What Causes It)
Sometimes, you’ll try to access your WordPress website or its dashboard only to be met with an entirely blank white screen. In most cases, when you run into an error, it’ll provide you with a code to help troubleshoot it. The 503 and 504 web errors are great examples of this.
Due to the lack of information the white screen error provides, it’s a bit more difficult to troubleshoot than other WordPress bugs. Plus, it sometimes appears just on some of your pages instead of all over your website. This means you might not be able to access your home page, but your dashboard still works (or vice-versa), which makes things even more confusing.
However, experience has taught us when the error pops up, it’s probably due to one of the following causes:
- A compatibility error with one of your plugins or themes. It may be that one of your plugins isn’t playing nicely with the others, or with your theme. In some cases, a WordPress core update can also lead to the white screen error due to compatibility issues.
- Your host has a low default memory limit. Every WordPress installation has an amount of memory each script can use when it runs. If the amount your server sets isn’t enough, you’ll run into problems such as the white screen error.
Narrowing down the source of WordPress compatibility errors tends to be rather tedious. Most websites use multiple plugins, so you need to work your way through them until you find the culprit. If they aren’t the source, you can move on to other possibilities.
6 Ways to Fix the White Screen of Death in WordPress
For your benefit, these methods are shown in order of least to most complicated. We’ll explain every new term we run into throughout the process, so you’ll be able to tackle all of them even if you’re new to WordPress troubleshooting. Finally, we’ll assume you don’t have dashboard access for most of these tutorials. If you do, things should be much simpler.
1. Disable All of Your Plugins
WordPress plugins enable you to extend the platform’s functionality by adding specific features. They’re one of WordPress most popular features, so a lot of sites tend to have several of them active at once.
If we assume plugins are the culprits for your white screen error, the best way to corroborate that hypothesis is to disable all of them at once. Since you don’t have access to your website, you’ll need to use File Transfer Protocol (FTP), which enables you to access your website using a program and transfer files back and forth securely.
We’ll teach you how to use it in a minute, but for now, log into your 000Webhost account and go to the Settings > General screen. You’ll find your FTP credentials at the top of the page:
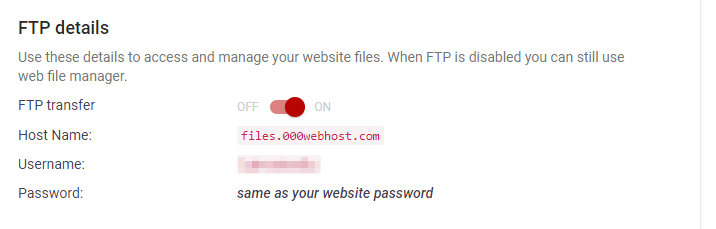
You’ll need the Host name, Username, and Password you find there to access your website using an FTP client. If you don’t have one, we recommend FileZilla, which is a great open-source option. Once you’ve installed and opened it, look for the Host, Username, and Password fields underneath the toolbar:
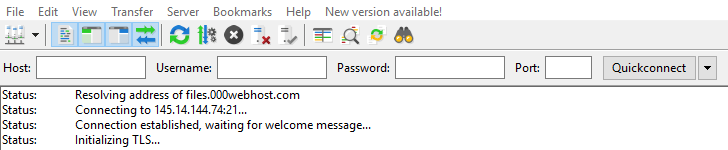
Enter your credentials within those respective fields, then click the Quickconnect button. The client will connect to your server, and when it succeeds, you’ll see a list of folders appear in the lower right hand panel:

In case you’re confused, the files on the left represent your local computer, while those on the right are your server’s – and you can drag and drop between them. If you do so, the client will initiate a transfer for you – it’s very simple. For now, look for the public_html folder on your server. This directory is also known as your WordPress root folder, and it contains all the files and folders that make the platform work.
Once you’re in, you need to follow these steps in order to disable all your plugins:
- Enter your public_html folder.
- Look for the wp-content directory and access it.
- Find the plugins folder, right-click on it, and choose the Rename option.
- Change your folder’s name to something you can easily remember, such as plugins-disabled.
- Right-click anywhere within the wp-content folder and use the Create directory option.
- Name your new directory plugins.
At this stage, you should have two folders: plugins-disabled and plugins. All of your site’s plugins will be in the former, whereas the latter should be empty. WordPress will automatically recognize the folder named plugins, and since it’s empty, all of your plugins will be disabled. Now try accessing your site as you normally would. If the error persists, you’ll need to continue troubleshooting.
However, if you resolved the error, it means a plugin is at fault, so return to your wp-content folder and delete the empty plugins directory. Now, rename the plugins-disabled folder to what it was previously. Inside you’ll find multiple subdirectories – one for each of your plugins:

You’ll now need to change the name of each of those folders one by one, which forces WordPress to disable it. After disabling each individual plugin, try accessing your site again. If the error persists, return the folder you just altered to its original name and try the next one.
Keep going until you find the plugin that’s causing the error. When you do, feel free to delete the folder altogether, which should fix your website. Our advice is to contact the developer for a potential fix if the plugin was vital to your workflow. In any case, you may also need to look for a replacement – one that’s updated and well-received by the WordPress community.
2. Disable Your Active WordPress Theme
If plugins weren’t the cause of your woes, your active theme will become the main suspect. Fortunately, disabling your theme is similar, but much more straightforward than the last method. You’ll need to open your FTP client again and return to the public_html > wp-content directory. Inside, look for the themes folder and follow these steps:
- Access the themes folder.
- Look for the directory that shares a name with your active theme. For example, if you’re using the Twenty Seventeen theme, its folder will be called twentyseventeen.
- Rename your active theme’s folder to something you can easily remember, such as twentyseventeen-disabled.
Renaming a folder works similarly to plugins with regard to disabling them. Now try accessing your WordPress website. If the WSoD doesn’t appear anymore, your active theme was behind it.
Also, since you disabled your active theme, WordPress should’ve reverted to another default theme, if installed. To get it back to how it was before, you’ll need to re-download the latest version of your theme and test it. Again, as with plugins, we recommend contacting the developer and potentially finding a suitable alternative as your main course of action.
3. Modify Your WordPress Website’s Memory Limit
Every plugin you install on your WordPress website runs its own set of scripts. These are files full of code designed to fulfill specific tasks. Each time one runs, it uses up some of your server’s memory. To prevent scripts from slowing down your website, WordPress limits the amount of memory they can use. While this is fine in theory, some scripts may require more memory than your setup enables them to use. When this happens, you’ll run into a WordPress error such as the WSoD.
In this case, the fix is simple – you just need to let WordPress know your plugins or custom scripts can use a bit more memory. To do that, you’ll need to use FTP, so log into your server and follow these steps:
- Go to your WordPress root folder and access it.
- Locate your wp-config.php file
- Right-click on it, and choose the View/Edit option, which will open the file locally using your default text editor.
- Scroll to the bottom of the file and look for the line reading That’s all, stop editing! Happy blogging.
At this point, you’ll need to paste the following line of code right above that message:
define( 'WP_MEMORY_LIMIT', '256M' );
This snippet tells WordPress your scripts can use up to 256MB of memory, which is far more than most of them need. This way, you can prevent the white screen WordPress error from popping up again down the line.
As always, try visiting your website now and if the white screen error is gone, pat yourself on the back. Otherwise, move into the next method.
4. Clear Your Website’s Cache
Most modern websites enable browsers to save some of their files locally, which cuts down on the time it takes to subsequently load them. It’s a common and crucial tactic for page load speeds, and is known as browser caching. However, while many people set up WordPress caching plugins to achieve this, caching can lead to errors if the stored files become outdated.
This method is arguably the easiest if you have access your dashboard and your caching plugin’s settings. For this example, we’ll use the W3 Total Cache plugin, since it’s one of the most popular WordPress options:
With this plugin, you can clear your cache by going to the Performance > General Settings tab and looking for the Page Cache section:
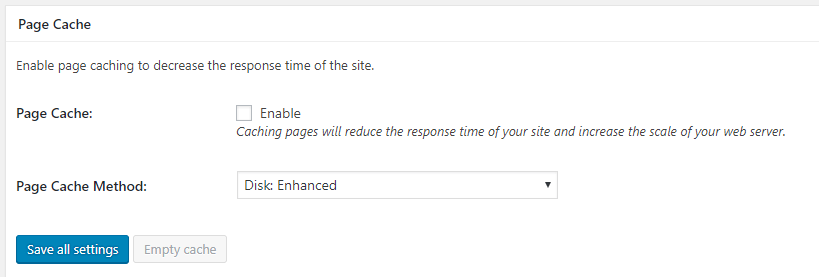
Look for the Empty Cache button, click it, then check to see if your website is working. If so, the problem is solved!
Of course, you may not be able to access your dashboard at all, and you may have already solved this problem during the first step. In addition, it’s always worth contacting your web host to check if there are any active server-based caching tools. If there are, ask them to clear those files to see if that fixes your website.
5. Enable WordPress’ Debug Feature
WordPress offers a lot of features to make your life easier. For example, it includes functionality you can use to troubleshoot errors more efficiently. However, this feature is disabled by default, since it’s mainly used by developers.
To enable it, you’ll need to access your website via FTP. Then follow these familiar instructions:
- Access your public_html folder.
- Look for the wp-config.php file, right-click on it, and choose the View/Edit option.
- Search for the line reading That’s all, stop editing! Happy blogging.
As you might recall, we raised WordPress’ memory limit a little while ago by adding an extra line of code right above the Happy blogging message. Now, you’re going to add a second code snippet in between those two:
define( 'WP_DEBUG', true );
This tells WordPress to log what happens every time you run into an error. Save your changes and try to access your website again. You’ll see the WSoD, but this will trigger WordPress’ debug feature and log the error.
To access your logs, navigate to public_html > wp-content using your FTP client and look for the debug.log file. Open it using the View/Edit option and look at the bottom of the file to see the last error it logged:
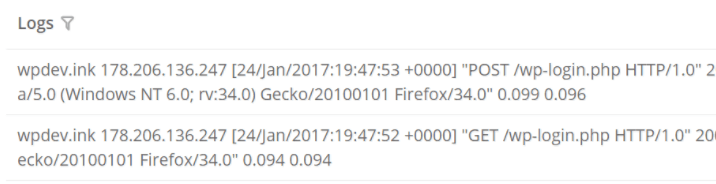
It can be hard to make sense of log files, but here’s what you need to pay attention to – the last file WordPress tried to open when the error popped up and the line of code that triggered it. If you can identify those two things, you should be able to locate the file via FTP. If it’s a plugin, a theme, or a custom script, you can remove it.
On the other hand, if you can’t make heads or tails of your log – or you’re (rightly) concerned about poking around in your WordPress core files – try getting in touch with your host’s support team. They’ll probably be ecstatic you have a log to show them, since it’ll enable them to troubleshoot things faster.
6. Restore Your Website From a Backup
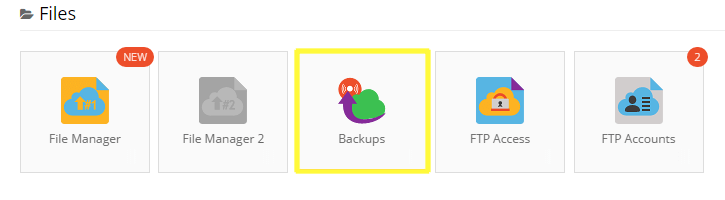
If all else failed, you still have one card left to play – restoring your website from one of your web host’s backups. Bear in mind, though – not every provider will back up your website for you, but most premium providers will. Hostinger, for example, enables you to create and download backups through its hosting control panel:
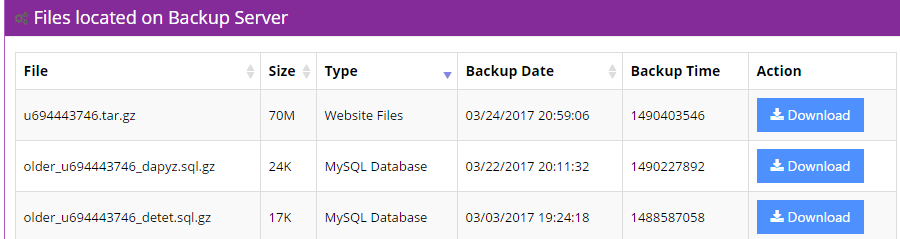
The platform automatically creates backups of your WordPress website and its database, as you can see below:
If you have the necessary backup files, you can restore your website to a state previous to the WSoD. To do this, go to the Import Website page within your Hostinger panel:
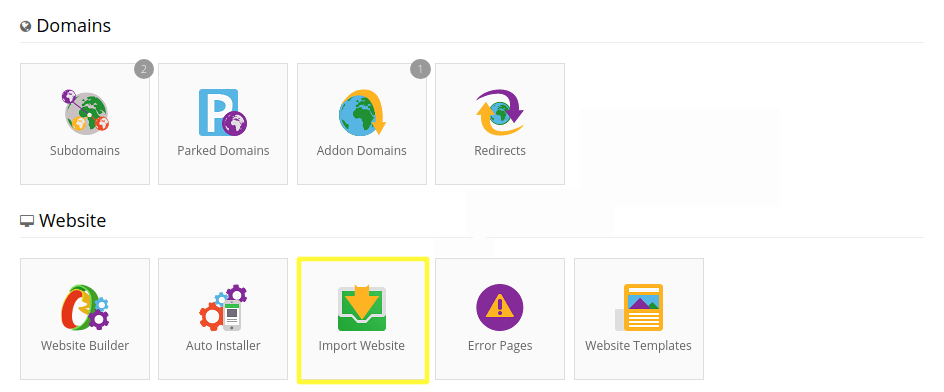
Once you’re in, upload your backup files using the simple interface the host provides you, and sit back while it restores your website. Sadly, this feature isn’t available to free hosting accounts, so you’ll want to upgrade your plan for that particular peace of mind.
What to Do If You’re Still Suffering From the White Screen of Death
By now, you should be a WordPress troubleshooting pro. If none of the above steps succeeded in repairing your website, don’t give up yet. At the very least, you ruled out a broad range of possible causes.
Your next step now should be to contact your web hosting’s support service and let them take care of the problem. Be sure to explain to them that you’re running into the WordPress White Screen of Death error and indicate on which pages it’s appearing.
Also, don’t forget to mention all the steps you took so far to troubleshoot the problem. That way, your support agent will have a better idea of where to start looking, and they’ll probably be able to solve things faster.
Conclusion
The WordPress White Screen of Death sounds scary, but it’s nothing you can’t fix on your own. At worst, it should take you a few hours to narrow down the cause of the error and take care of it. However, chances are you’ll have your website back up and running long before that. Plus, once you’ve dealt with the WSoD, no other error should scare you!
Let’s briefly recap the six ways you can fix the white screen WordPress error:
- Disable your plugins to narrow down the culprit.
- Disable your active WordPress theme.
- Modify your WordPress website’s memory limit.
- Clear your website’s cache.
- Enable WordPress’ debug feature.
- Restore your website from a backup if all else fails.
Do you have any questions about how to tackle the WordPress WSoD? Ask away in the comments section below!