
If you’re like any one of us, you definitely want your WordPress site to standout from the crowd in terms of branding. WordPress favicon is great at improving your brand’s image especially in a world where people browse the internet using multiple tabs.
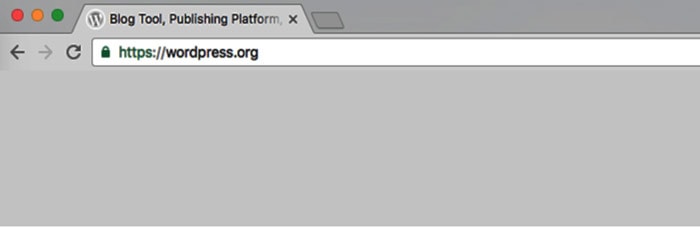
As a beginner, you’re probably wondering what this favicon business is all about. For starters, a favicon (short for favorite icon) is the small image that appears before the page title in your browser window.
A favicon is usually 16 by 16 pixels in size but it can have other dimensions i.e. 32 by 32 px, 48 by 48 px and the WordPress-recommended size of 512 x 512 pixels among others. For illustration purposes, a favicon appears in your browser tab as so:

A WordPress favicon isn’t confined to the browser tab only. It can be displayed in the URL bar or as an application icon in mobile devices. It is usually saved as favicon.ico in your WordPress directory but it can take many other image formats i.e. PNG, JPG and GIF.
Favicon Best Practices
Before you go ahead, it’s time to decide what’s makes the perfect favicon. You want to be successful, right? Here are best practices you should follow when creating your favicon.
The traditional approach to implementing a favicon involves placing a favicon.ico file inside your root folder. This has been the practice since the advent of favicons back in 1999.
Back then, much of web surfing happened on basic desktop browsers. Nowadays, however, the web landscape has changed tremendously what with the entrance of devices of all types and sizes. As such, the favicon has had to adapt accordingly to keep up with this change.
That said, a single 16 x 16 favicon.ico file just won’t cut it anymore. You need at least four icons for Android devices, desktop browsers, iOS and Windows Metro UI.
You should also pay close attention to the design of your favicons as well. For example, transparent icons look amazing on Android, but iOS fills the transparent parts with black, which is not what you want.
This means you have to look beyond the sizes of your favicons. Speaking of sizes, which dimension should your favicon.ico be?
What Dimensions to Use?
While you can use any other image format such as PNG and GIF, the .ico format is preferred since a single file can contain multiple graphics.
Thanks to this, you can create a single favicon.ico file that contains icons of sizes 16 x 16, 32 x 32, and 48 x 48 as Microsoft recommends.
If creating .ico files is not your cup of tea, you can go with favicon.png. This, however, means you will need to create many more files for various devices.
Which begs the question: Why go through the trouble while you can create a single .ico file containing multiple .png files?
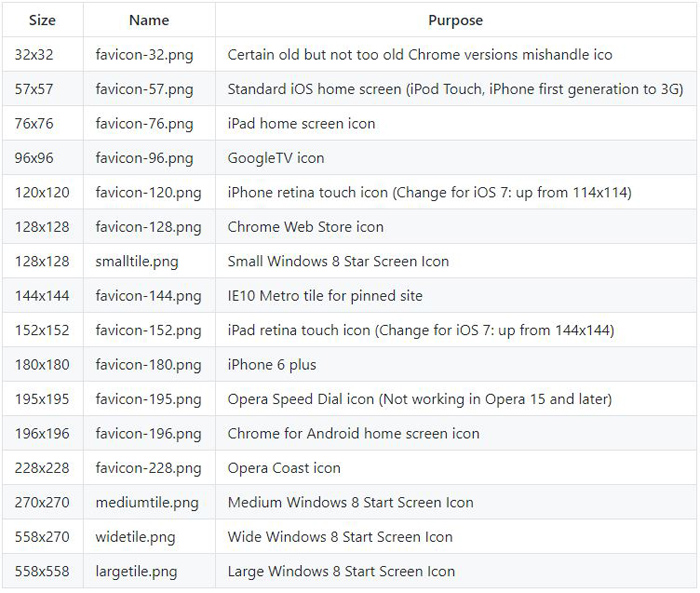
Here is a tiny table for common favicon.png sizes:
You can create your favicon.ico file from .png files using an image editing tool such as Adobe Photoshop, GIMP and an online tool such as Real Favicon Generator. Best part is this online tool comes with a WordPress plugin that makes creating and implementing favicons as easy as pie.
Later on, we show you how to add favicons to your WordPress site, including how to do it manually without breaking a sweat.
Why Use a WordPress Favicon?
Firstly, a favicon improves your site’s user experience and usability. Most users open multiple tabs.
This hides your page title as the user keeps opening more tabs. With a favicon, the visitor can easily recognize your site and quickly switch back to your site whenever they need.
Secondly, whenever your web visitors add your site/page to their home screen on mobile devices, your favicon becomes the icon they use to easily identify your site/page later on.
Thirdly, favicons are used to save bookmarks, meaning a user can easily spot your bookmark. Without a favicon, the user will have a hard time finding your site especially if you have an extensive list of bookmarks.
From these three reasons, you can clearly see a favicon is a powerful branding tool.
In the next section, we show you exactly how to add a favicon to your WordPress site like a boss.
How to Add a WordPress Favicon
There are several methods of adding a favicon to your WordPress site, and they are all easy so don’t fret! Before you add a favicon, you definitely need to create an appropriate image.
WordPress recommends creating an image that is at least 512 x 512 pixels wide and tall. You can use a part of your logo, gravatar or any other image you fancy so long as it builds on your brand image.
With that in mind, let’s proceed with multiple ways of adding a favicon to a WordPress site.
WordPress Customizer
The WordPress Customizer comes with a nifty feature that makes adding a favicon as simple as A, B, C. Prior to this, you had to plonk code into your theme files or use plugins.
The Site Icon feature in WordPress Customizer makes this the easiest method of adding a WordPress favicon, so we don’t expect you to run into any problems:
- Login to your WordPress admin dashboard and navigate to Appearance -> Customize:
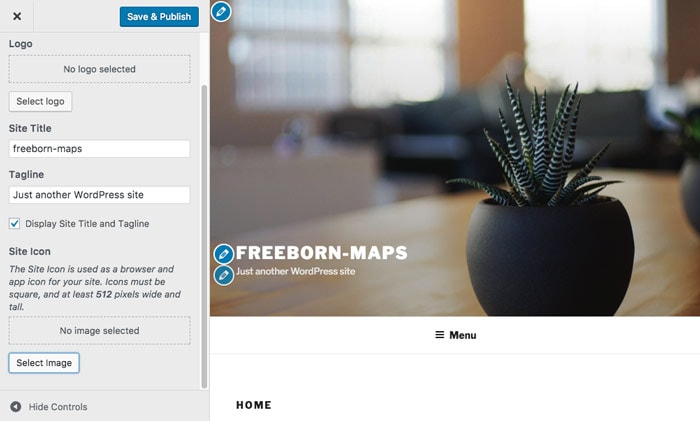
- Next, click Site Identity tab to reveal Site Title, Tagline and Site Icon:

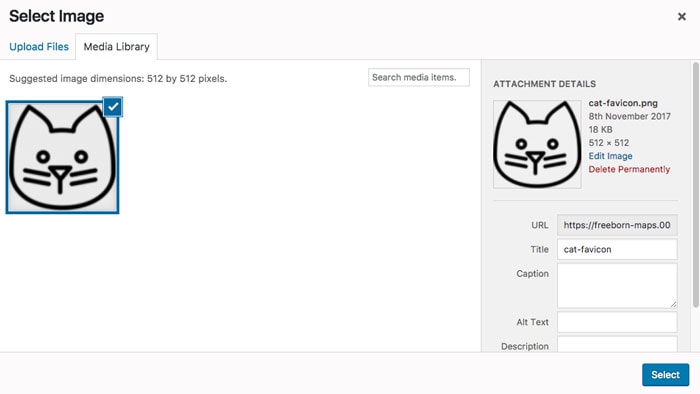
- Click on the Select Image button and upload your image.
- Next, click the Select button on the ensuing screen:
 This takes you back to the WordPress Customizer.
 - Now, click the Save & Publish button:
 This takes you back to the WordPress Customizer.
And that’s it! Reload your site to see your new favicon in action.
If you’d love to have a go at a WordPress favicon plugin, our author recommends the All In One Favicon plugin.
All In One Favicon WordPress Plugin
If adding a favicon via WordPress Customizer doesn’t work for one reason or another, you can always count on the All In One Favicon WordPress plugin by Arne Franken.
In the next few lines, we show you how to install and use All In One Favicon to add a favicon to your site.
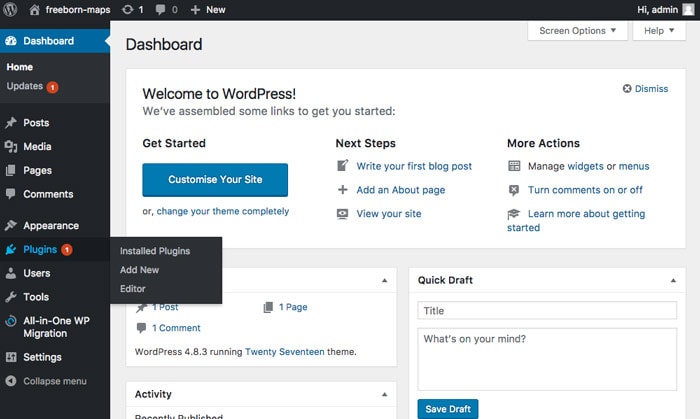
Login to your WordPress admin dashboard, navigate to Plugins and click Add New:
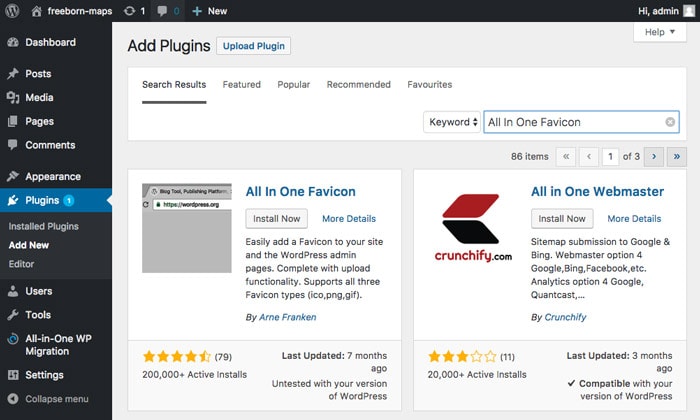
On the Add Plugins page, search “All In One Favicon” and install the first result as shown below:
Activate the plugin and then navigate to Settings -> All In One Favicon:
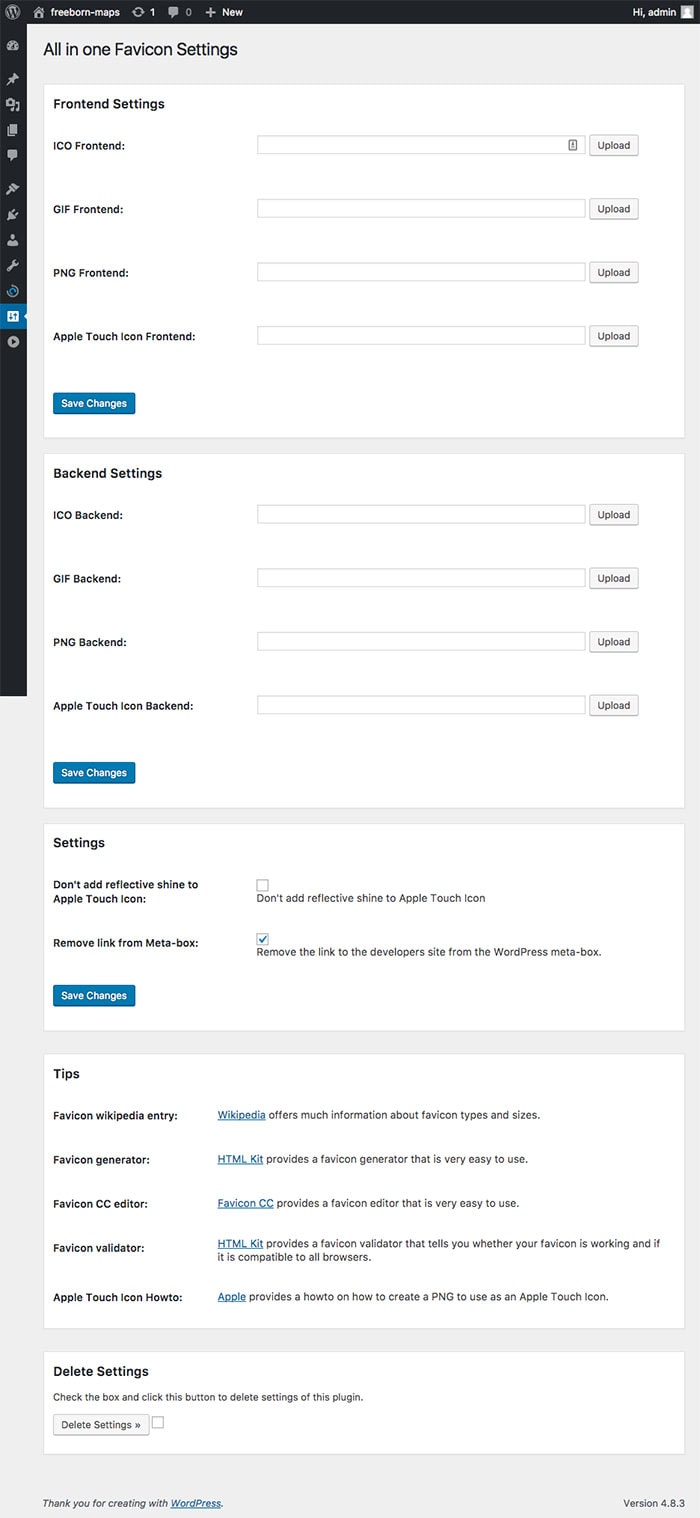
The All In One Favicon dashboard is as straightforward as it gets. There are 5 sections namely:
- Frontend Settings – Allows you to add frontend favicon in ICO, GIF and PNG formats. If you are the perfect beginner, the frontend is the “front” side of the your website that your visitors see. These settings also allow you to specify a frontend touch icon for Apple mobile devices.
- Backend settings – Same as frontend settings but for the backend, the “back office” side of your site that the admin and logged-in users see.
- Settings – Here, you can add or remove reflective shine to Apple Touch icon and the link to the developer’s site.
- Tips – In this section, you find links to a favicon generator, editor, validator and more information about favicons.
How to Add a Favicon using All In One Favicon
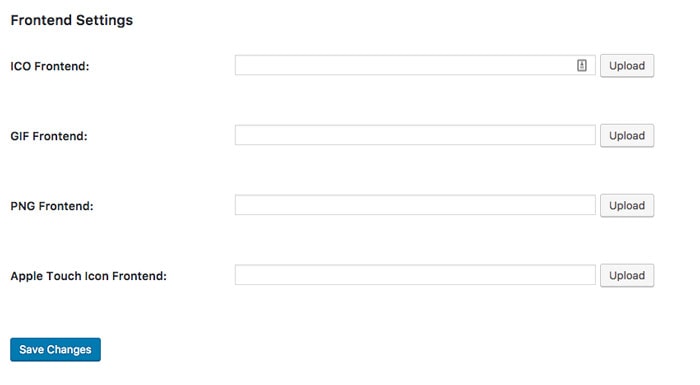
For starters, decide the image format i.e. ICO, GIF or PNG and the Apple touch icon you wish to use. Next, click the Upload button in the respective field, select your image and click the Save Changes button:
Then reload your site to see the changes. You might need to clear your browser cache and other types of cache in case the favicon doesn’t show immediately.
How to Add Favicon to WordPress Manually
Adding a favicon to your WordPress site manually is incredibly easy you should be done in a jiffy. Let’s go over the steps:
- Create a favicon.ico file using any of the tools we mentioned a moment ago
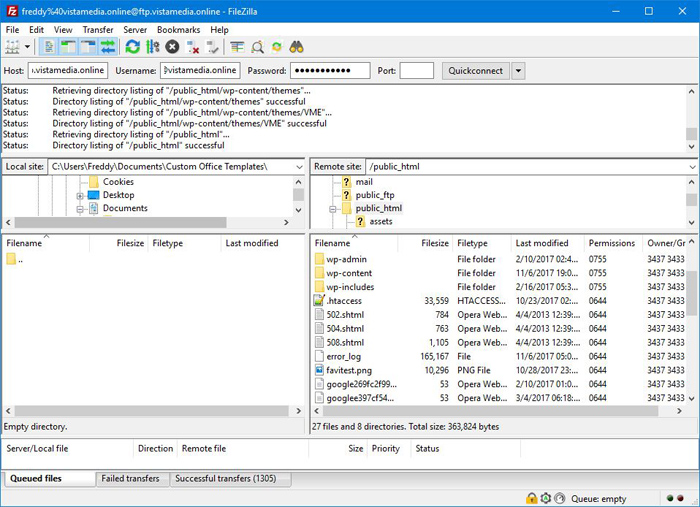
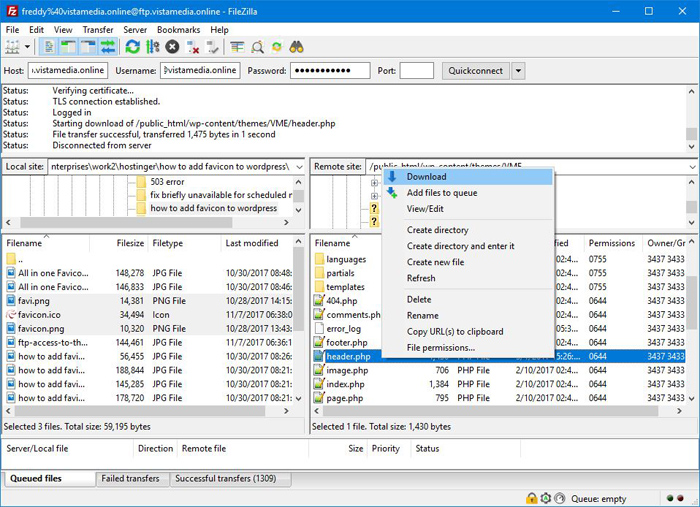
- Login to your WordPress root directory via FTP (usually this is public_html but it can be anything else depending on where you installed WordPress. You will know you’re in the right folder if you see folders such as wp-admin, wp-content and wp-includes):

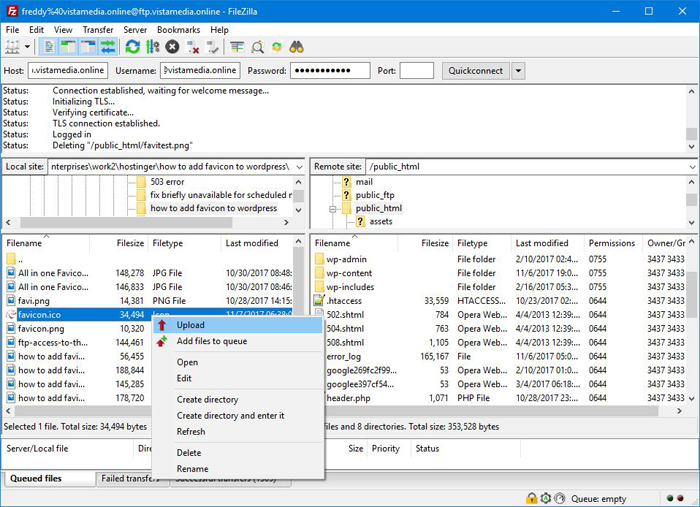
- Upload the favicon.ico file to the root directory of your WordPress site:
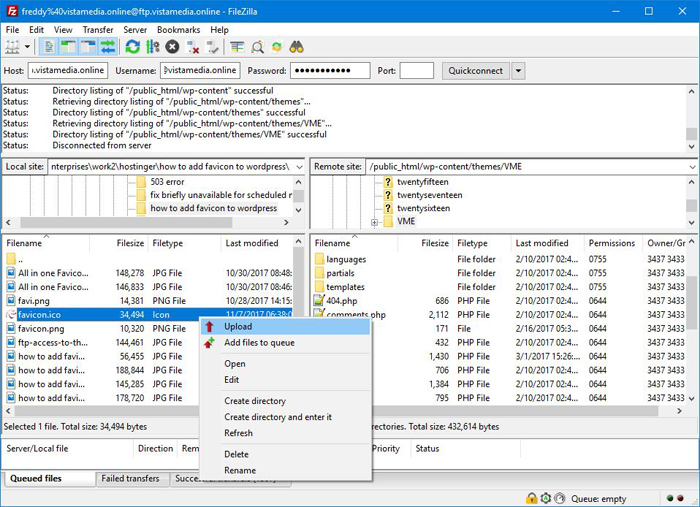
- Finally, navigate to wp-content -> themes -> Your_Active_Theme and upload favicon.ico there as well:
And that’s it! Your favicon should be live on your WordPress site.
But…There’s More
While the following steps are unnecessary, it pays to declares your favicon inside the <head> element of your site, more so if you have multiple favicon.png files.
- Login to your WordPress root directory via File Manager or FTP:
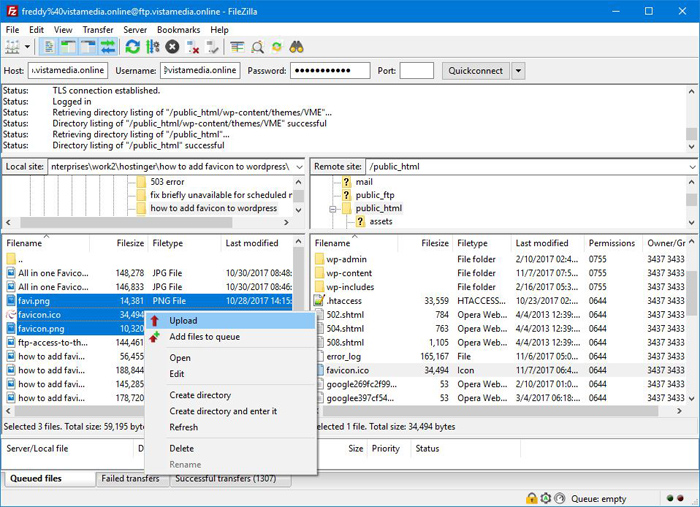
- Upload all of your favicon.png files to the WordPress root directory:
- Next, navigate to wp-content -> themes -> Your_Active_Theme. Here, download the header.php file to your computer:
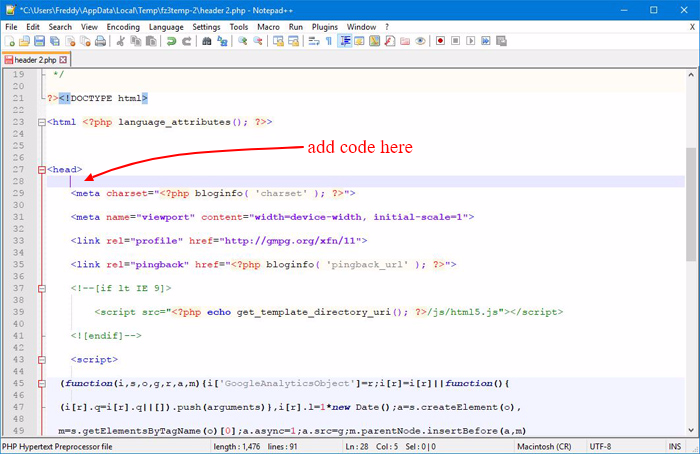
- Open the file using Notepad++ or your favorite code editor:

- Add the following block of code inside the
<head>...</head>element, just after the opening<head>tag as shown in the image above:<!-- Desktop browsers (including 16x6, 32x32 & 48x48 PNGs) --> <link rel="shortcut icon" href="/favicon.ico"> <!-- Modern browsers & Devices --> <link rel="icon" type="image/png" href="/favicon-16x16.png" sizes="16x16"> <link rel="icon" type="image/png" href="/favicon-32x32.png" sizes="32x32"> <link rel="icon" type="image/png" href="/favicon-48x48.png" sizes="48x48"> <link rel="icon" type="image/png" href="/favicon-64x64.png" sizes="64x64"> <link rel="icon" type="image/png" href="/favicon-96x96.png" sizes="96x96"> <link rel="icon" type="image/png" href="/favicon-128x128.png" sizes="128x128"> <link rel="icon" type="image/png" href="/favicon-196x196.png" sizes="196x196"> <!-- iOS & other mobile devices --> <link rel="apple-touch-icon" href="touch-icon-iphone.png"> <link rel="apple-touch-icon" sizes="76x76" href="touch-icon-ipad.png"> <link rel="apple-touch-icon" sizes="120x120" href="touch-icon-iphone-retina.png"> <link rel="apple-touch-icon" sizes="152x152" href="touch-icon-ipad-retina.png"> <link rel="apple-touch-icon" sizes="167x167" href="touch-icon-ipad-pro.png"> <link rel="apple-touch-icon" sizes="180x180" href="touch-icon-iphone-6plus.png"> <!-- Windows Tiles (optionally omitted and replaced with browserconfig.xml in root directory) --> <meta name="msapplication-TileColor" content="#582686" /> <meta name="application-name" content="Your Website" /> <meta name="msapplication-square70x70logo" content="tile-small.png" /> <meta name="msapplication-square150x150logo" content="tile-medium.png" /> <meta name="msapplication-wide310x150logo" content="tile-wide.png" /> <meta name="msapplication-square310x310logo" content="tile-large.png" />
- Save your changes and upload header.php back to your active theme’s folder.
Conclusion
Adding a favicon to your WordPress site is extremely easy. Considering it’s a a great addition to your website in terms of user experience and brand recognition, a favicon is an important part of any website. Have you ever added a WordPress favicon? How did you go about it? Let us know in the comments below!