
Login pages are something you’re probably very familiar with. Almost every online service requires you to log into your account to access its features, and WordPress is no exception. The only difference is, your WordPress login page is a lot more versatile than you might imagine.
At first glance, your login page may not look like much. It enables you to access your dashboard and reset your password – the usual. However, there are a lot of ways you can customize and secure it, such as by using CAPTCHAs. In other words, you can make your WordPress login unique.
In this article, we’re going to guide you through the process of finding your login page and accessing your dashboard. We’ll also talk about how to retrieve your credentials, reset your password, and even increase your WordPress login security. We’ve got a lot of ground to cover, so let’s do it!
How to Log Into WordPress (And Retrieve Your Credentials)

Your WordPress login page protects your website from unwanted visitors.
Login pages all work similarly, regardless of which platform or application you’re using. To get past them, you need to enter the right combination of credentials. Without them, the service will reject your attempt to access it.
WordPress’ login page fulfills those exact functions. It keeps people that aren’t supposed to get to your dashboard out, and helps your co-workers or users regain access to their accounts if necessary. In most cases, you can get to your website’s login page by visiting your website’s main URL, appended with /wp-login.php.
Keep in mind – some people change their login page’s URL for increased security. In fact, a few web hosts even take the liberty of doing it for you while setting up WordPress, to keep your website safe. However, in the vast majority of cases, you’ll find your login page using the default URL format mentioned above. Once at the login screen, you can enter your admin username and password. As you may recall, you chose these credentials while installing WordPress on a free 000webhost hosting control panel:

If you’ve forgot your credentials, click on the Lost your password? button reset them:
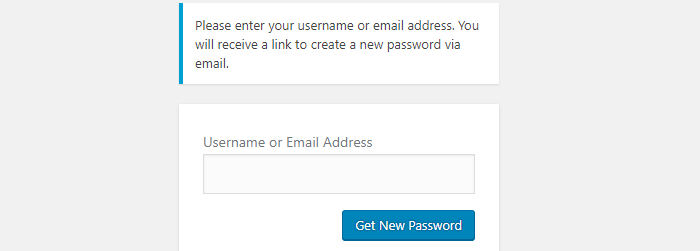
As long as you retain access to the email address associated with your admin account, you’ll never get locked out of your WordPress website. The platform will send you an email with a link where you can set a new password, then you’ll be able to get back into your dashboard.
On the off chance you do lose access to the email account associated with your website, there’s still a way to get back in – although how to do that is for another article.
How to Secure Your WordPress Login Page (In 3 Ways)
WordPress’ login page works just fine out of the box. However, that doesn’t mean you can’t make yours better. In this section, we’re going to teach you three ways to do it using simple plugins. Let’s get to work!
1. Add a CAPTCHA to Your Login Page
CAPTCHAs are everywhere these days. In a nutshell, these simple tests provide you with an elegant way to stop bots from trying to break into your website via your login page.
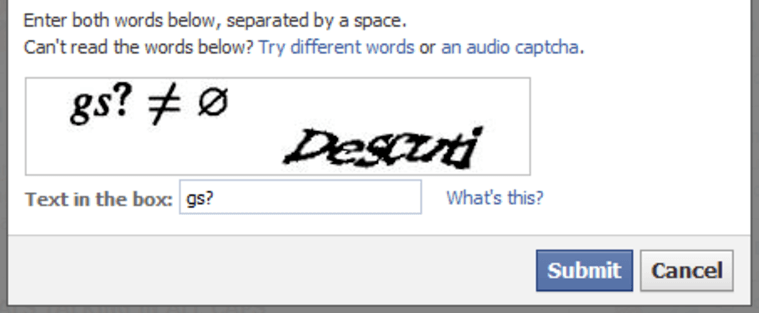
The way CAPTCHAs work is usually by displaying a screenshot of text and numbers. These images are purposefully hard to read so computers can’t identify them and break through. However, they’re easy for humans (that’s us!) to make sense of. There’s also a new form of CAPTCHA called reCAPTCHA that’s gaining a lot of ground. They were designed by Google, and they just require you to click on a box to prove you’re human:

It sounds too simple to be true, but it works. By analyze your mouse movements, reCAPTCHAs determine if you’re a human or a bot. A computer, for example, might instantly move its mouse to the center of the reCAPTACHA box, whereas humans require a moment to find it. In practice, of course, reCAPTCHAs use a lot of elements to distinguish humans from bots, but suffice it to say, they work. More importantly, they’re less annoying for users, so implementing one on your WordPress login page is a good idea.
To do it, we’re going to use the noCAPTCHA reCAPTCHA plugin since it enables you to get the system up and running in minutes. First off, login to WordPress and jump to your Plugins tab. Inside, look for the Add New button and click on it. Now type the name of the plugin in the search bar to the right of the screen and wait for it to appear as the first result below:

Click on the Install Now button next to the plugin’s name and give your website a minute to set everything up. When the plugin is ready for you to use it, the Install Now button will be replaced by one that says Activate – go ahead and click on it.
A new No CAPTCHA reCAPTCHA tab will show up on your WordPress dashboard. If you click on it, you’ll enter the plugin’s settings screen. Before we can enable a reCAPTCHA for your login screen, you’ll need to get a Site key and a Secret key from Google, which are necessary for the feature to work:

Let’s get started with the Site key. To get it, just click on the Grab it here link below the field where it needs to go. Doing so will send you to Google’s reCAPTCHA site once you’re logged in. Here, you can see a list of all your sites already using reCAPTCHAs:

If you scroll down, you’ll see an option to register a new website. Just set up a tag for it for identification purposes and choose which type of CAPTCHA you want to use. For this example, we’ll go with a reCAPTCHA, of course:

Now, a new field will appear underneath, where you need to add your website’s domain sans the http and www prefixes, like this:

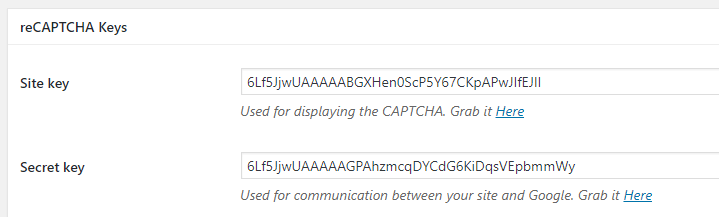
Finally, tick the box at the bottom of the screen to accept reCAPTCHA’s terms of services and click on the Register button. On the next screen, you’ll see two fields including a Site Key and a Secret key for your website. As you might recall, the No CAPTCHA reCAPTCHA plugin needs both of these to work, so copy and paste them now, then click on the Save All Changes button below:
Afterward, scroll down and enable the Login Form option under Display Settings, which is turned off by default. Doing so will add a reCAPTCHA to your login screen, which you can check out right away:
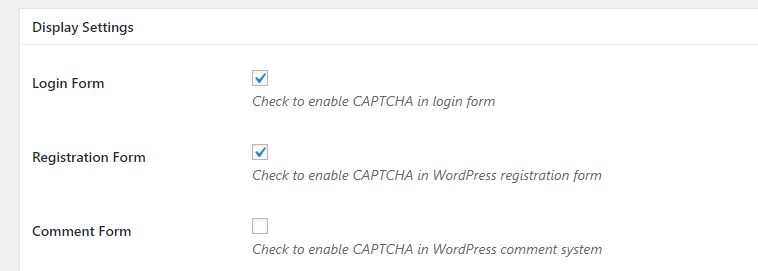
You might have spotted the plugin also includes options to add CAPTCHAs to your registration screens and comment sections. The first option is a smart move to prevent fake registrations. However, the second one is more of a personal choice since dealing with spam comments in WordPress is already reasonably straightforward. Either way, you’ve just took your first step towards securing your WordPress login page!
2. Customize Your WordPress Login URL
As we mentioned earlier, most websites use the default structure for their WordPress login pages (for example, https://www.yourwebsitegoeshere.com/wp-login.php). However, the problem is attackers know most WordPress websites use it. This means they can launch automated attacks on your page to try and gain access to your site. To put it another way, there are three critical pieces of information someone needs to enter your dashboard – where to find your login page, your username, and your password.
By switching your login page’s default URL, you take away one of those pieces of information. Plus, it’s fairly easy to do with the right plugins. In this case, we recommend the WPS Hide Login plugin, which is dead simple to use:
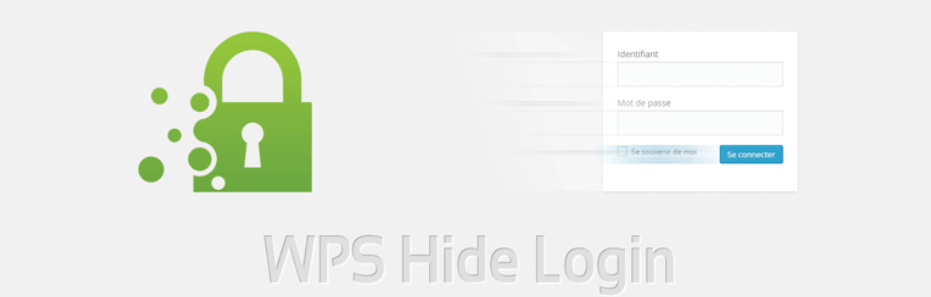
To get started, install and activate the plugin, following the same instructions as the last section. The great thing about this plugin is it doesn’t add any unnecessary new tabs to your dashboard. To use it, go to the Settings > General screen and scroll to the bottom of the page. There, you’ll find a new section enabling you to change your login URL quickly:

From here, replace your default login URL with anything else you want. Ideally, it’ll be different enough from the wp-login default that attackers won’t be able to guess it. However, you also want to keep it simple so you can remember it without having to bookmark your WordPress login page.
Once you’ve decided on a new URL for your login screen, click on the Save Changes button and you’re off to the races. If you now try to access your old login URL, you’ll find an error screen:

If you ever want to restore your login screen’s default URL, just delete the one you typed into the Settings > General section and save your changes. You’ll then be able to access your login screen via wp-login.php as usual.
3. Add Two-Factor Authentication (2FA)
Usually, login screens don’t require anything beyond a username and a password (and maybe a CAPTCHA). However, in recent times, more and more websites are enabling you to add further authentication elements to your login process.
To put it another way – think about your username and password as an authentication factor. They work well enough on their own, but if you add a second factor, such as a one-time password sent to your email when you access a website, security increases exponentially. These days, some of the most popular 2FA options include codes sent via email or text codes. There are even dedicated 2FA applications you can link to your web accounts, such as Google Authenticator.
To sum it up, implementing 2FA is definitely a good move on your part. Plus, you can always just keep it as an optional requirement for your users. To implement it, we recommend using the Google Authenticator – Two Factor Authentication plugin:

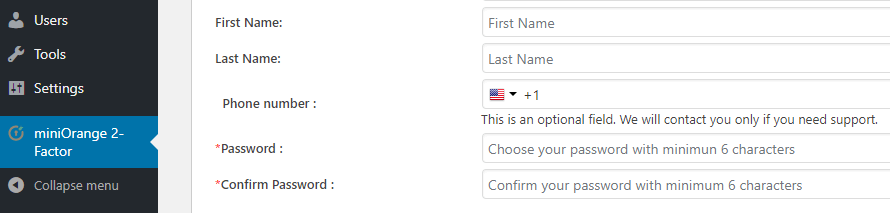
Keep in mind – despite its name, this plugin isn’t associated with Google. It just advertises the fact it supports the Google Authenticator app among others, such as Authy, and the iniOrange Authenticator App (built by the plugin’s own developers). To implement 2FA on your login page, install and activate the plugin. Next, go to the miniOrange 2-Factor tab within WordPress. Here, you’ll need to enter a working email and a password to register a miniOrange account and use the plugin:
Now the plugin will send a code to your email to verify its ownership, in true 2FA-plugin fashion. Enter it and click on the Validate OTP button:

After validating your email, jump over to the Setup Two-Factor tab. Inside, you can pick your favorite forms of 2FA, which your users will be able to choose from when they register:

For this tutorial, we’ll just stick to Email Verification. After enabling it, you can log right out and return to your WordPress login screen. Now you’ll see an option to setup 2FA for your account during the login process:

We definitely recommend you use 2FA since it’s yet another line of defense for your login screen. Now, each time you try to access your dashboard, you’ll need to check your email for a one-time code and enter it before getting in. It shouldn’t take more than a few seconds, but it makes your account that much safer.
Conclusion
Your WordPress login page looks simple at first glance. In fact, it works just the same as most other login pages do. However, WordPress’ real strength lies in its ease of use. Recovering your password, for example, can be done in a matter of seconds if you have access to your admin email. Even if you don’t, you can always reset it manually, so you’re never out of options.
Plus, you can customize your login page any way you want. For example, you can add a CAPTCHA to your WordPress login or change its default address. 2FA also makes for a great addition to any login page, and these changes combined should deter most attackers.
Do you have any questions about how to secure your WordPress login page? Let’s talk about them in the comments section below!