
If you want to become a website developer, learning HTML is the perfect way to start. HTML (Hypertext Markup Language) is widely used and easy to learn. In this article, we will overview everything related to HTML for beginners.
What Is HTML?
Before you begin familiarizing yourself with how HTML works, first it’s better to know what HTML is in general.
HTML (Hyper Text Markup Language) is the most basic language used for website development. Together with CSS and JavaScript, HTML is a fundamental aspect in creating beautifully structured, responsive websites.
To better understand what it is, let’s closely look into every word of HTML.
- HyperText means a word, a phrase, or a sentence with a link, which will direct you to another part of the internet. Whether it’s another page on the same site or a different website altogether. This makes internet browsing easy and fast.
- Markup. Back in the day, editors would write annotation (a markup) surrounding a certain part of a text to give information on how it should be displayed – the same goes for HTML. Codes are used as the markup for the same purpose, telling web browsers of each element’s characteristic.
- Language. Every language has the same principle, and that includes HTML – it has a standardized set of rules so that things can be communicated properly. In this case, it’s so web browsers can interpret the information and use it to display items the way developers intended to.
In short, HTML is a language that aims to provide information for how a certain element has to be displayed on a website.
There are a few terms surrounding the making of HTML documents, which are:
- Tags (codes used as the markup, in the form of bracketed letters or words)
- Elements (consists of an opening tag, content, and a closing tag)
- Attributes (additional information to set a deeper preference for an element)
Where Is HTML Used?
It’s the most common language that sets up the structure of a website.
However, its application also goes way beyond mere website creation. Understanding the other ways HTML is implemented will surely help you make use of HTML at its full potential.
These are how you can take advantage of HTML for other uses:
- Allowing visitors to post comments with HTML formatting
- Customizing your text in an email body
- Helping you understand offline HTML documents better
HTML Page Structure
To have a better understanding of how HTML works, you need to understand the basic structure of a page in HTML.
Every web page has three structural elements: head, body, and footer.
Head
The head is located at the top of your web page and contains the site’s identity. The range of a header is set using <head> and </head>. Other elements presented in the head section are as the following:
- Title of the web page; <title> … </title>
- Logo and favicon
- Meta tags (description, keyword, author, etc)
- Scripts and styles (for JavaScript and CSS)
Main Body
The main body is what represents content on a web page. It contains all the elements that will appear on the site – images, text, videos, etc. The HTML tag which defines body is <body> and it’s placed between the head and footer tags.
Footer
As the name suggests, a footer is located at the bottom of your page and defined by the use of <footer> tag in the HTML file. It usually contains information regarding copyrights, sitemap, social media buttons, and contact information.
How does an HTML file work?
HTML is a compilation of tags and attributes that are used to set the text formatting in web pages. Using HTML tags, you can define text to have a specific font, size, color, etc.
The easiest way to create an HTML document is by using an HTML editor. These editors highlight and autocorrect syntax. You can use any text editor to create an HTML document, but using an editor makes it a lot easier.
Protip: Always remember to save your HTML file as .html
The finished line of code looks something like the example below:
<DOCTYPE! html><html lang="en"><head><title>This is the title of your website!</title><meta name="description" content="Your site description"><meta name="keywords" content="HTML, learning, beginners"><meta name="author" content="Your Name"></head><body><h1>Hi! I am a heading.</h1><p>And I am a paragraph.</p></body><footer>This is where you would put contact information, sitemaps, etc.</footer></html>
Go to the folder of your saved .html file, then open it on any browser.

There you go! You just successfully created a very basic web page. Later on, you could add more HTML element variations – and some CSS – to make your site look and function better.
If you want to make your HTML document live, you have to upload it on a web host. Each time a visitor clicks on your website, the hosting will extract information from your document on the server and translate it into a visible form.
HTML Tags
HTML tags have a purpose of defining the range for each formatting in text or paragraphs. The opening tag indicates where an element starts, and the closing tag defines where it ends. Take a look at the code below.
I love <b>food</b> and <i>cycling</i>!
The result of the code above will be: I love food and cycling! Note that the only word in bold is only “food”, and only “cycling” is in italic. The format will only affect the words inside the tags.
Heading Tags
Every piece of content should have a heading as its title. Even more, you can make a better-structured article by making use of subheadings.
Headings in HTML can be set using the tags <h1> up to <h6>. The higher the number, the smaller the headings are. After you write the opening tag, don’t forget to close it with the same heading type to mark a stop to the effect.
Here are the examples for each heading size.
<h1>This is heading 1!</h1><h2>This is heading 2!</h2><h3>This is heading 3!</h3><h4>This is heading 4!</h4><h5>This is heading 5!</h5><h6>This is heading 6!</h6>
And you can see the result below.

As you can see, setting the heading tags will automatically add spacing after the text. They will line up nicely with paragraphs to write a fully-structured article.
Paragraph Tags
You can write a paragraph in HTML using the tag <p>.
<p>This is a paragraph!</p><p>And this is another paragraph!</p>
The use of paragraph tags will add a margin before and after a paragraph. However, this tag won’t recognize a line break and will show both sentences in the same line.
<p>This is the first line of the paragraph. This is supposed to be the second one.</p>
You can look at the result below.
![]()
Line Break Tags
Now, if you want to make HTML recognize a line break in your paragraph, you need a line break tag <br>. Since it’s an empty tag, you don’t need to add a closing tag. Take a look at the example below.
<p>This is the first line of the paragraph.<br> This is the second one.</p>Now, when you try the code, both sentences will no longer appear in the same line.
Image Tags
Another thing you can do in HTML is adding an image, using the tag <img>. It’s also an empty tag, so no need for a closing tag.
<img src="http://example.com/this-is-the-direct-url-of-your-image.jpg">Before you go to coding, you need to upload your image to a direct image hosting. Then, you need to copy the direct image URL and paste it in your code.
Make sure the URL has the image format in the end such as .jpg, .png, .bmp, and .gif. Otherwise, the image won’t show up.
HTML Elements
Now that you learned about tags, you should know what an HTML element is.
Defining an HTML Element
An HTML element starts with an opening tag and ends with a closing tag – both surround the content. Take a look at the example below.
<h1>This whole code makes up for an HTML element, from opening to closing tag.</h1>Most browsers will still show the intended results even though you don’t add the closing tags, like the example below.
<p>This is a paragraph.<p>This is a second paragraph.<p>We don't use closing tags but we'll still appear regardless.
However, it is not advisable as it may lead to unexpected errors if used with codes that have more complex tags.
Nested HTML Elements
In HTML, it’s possible to insert an element inside an element. However, it’s important to close the tags in the proper order to avoid an error. This is what’s called “nesting”.
Don’t make the same mistake as the code below.
<h1><i>This is an italic heading!</h1></i>The tags in the code above are closed incorrectly. Since the opening tag <i> is the closest one to the content, then it should be the one you should close first.
It may still show the result with no problem. But in certain cases, the code will show a different outcome than the one you have in mind if it’s not nested correctly.
<h1>This is <b>bold</h1>, this is not.</b>If you combine a full element with another that only affects a certain part, it’s even more advised to nest the tags in the proper order. Otherwise, the result won’t be as you’re expecting.

Bold, Italic, and Underlined Text
Adding text is just the tip of the iceberg. You can do so much more with HTML by adding formatting to your text.
You can make a word bold, italic, and underlined by using the respective tags for each of them.
<b>This is a bold text.</b><i>This is an italic text.</i><u>This is an underlined text.</u>
Due to the nature of nested HTML, it is also possible to apply those three formatting at once.
<b><i>HTML is very <u>important</u> to learn as it can make you a better <u>webmaster</u>!</i></b>HTML Attributes
When a web browser looks for elements, it also looks for the attributes too. An attribute is a characteristic of a tag that acts as additional information.
Think of it as modifiers – you can use attributes to add more preferences for an HTML element. For example:
<img src="http://example.com/picture.jpg" width="900" height="450" alt="A description of a picture">There are four attributes from the code above, which are:
- src (to insert the source of the image)
- width
- height
- alt (to add an alternative text)
Adding attributes gives you more freedom to customize your site’s elements – from changing color to setting a style.
Lang Attribute
Lang attribute is useful to declare what language you’re using for your web page or your paragraph.
<DOCTYPE! html><html lang="en"><head><title>This site's default language is English</title></head><body></body></html>
You can also use a lang attribute to specify a certain element. It is useful if you want to write a paragraph with a different language from your default one.
<p>For example, this below is a paragraph in French</p><p lang="fr">Bonjour! Je suis un paragraphe français!</p>
But what if you want to write in another language only at a certain part of your paragraph? You can make use of nesting element with <span>.
<p>This is in English, but <span lang="de">das ist auf deutsch.</span></p>At first glance, using a lang attribute won’t make any difference to your page. However, there are a few benefits to have by specifying your site’s language, which is as follows:
- You can set your site to automatically change the font for a specific language(s)
- It’s easier for a search engine to extract information from your site
- A translation tool can do a better job if it can detect your site’s or certain element’s language
- A screen reader will read your content in the correct language
The language code abbreviations used in the lang attribute are ISO 639-1 such as en (English), fr (French), and de (German). You can find the complete list for each language here.
Align Attribute
You can add an align attribute to your elements such as images, videos, and paragraphs to set their position.
The values to set the position of your elements are top, bottom, left, right, and middle.
<img scr="http://example.com/yourpicture.jpg" align="right">
The code above will show your picture on the right. This also works for other elements such as paragraphs (<p>), objects (<object>), division (<div>), etc.
Important: Since HTML5 doesn’t support the align attribute, use CSS instead to set alignment for your object.
To use CSS for setting your element’s alignment, use the style attribute. Then, add align:position as the value. Take a look at this example below.
<img style="align:right" scr="http://example.com/yourpicture.jpg">
Note that the style attribute will work for every other HTML element as well. It will also override the <style> element set in the <head> section.
Href Attribute
When designing a web page, a need for linking to another article or website will arise at some point. Creating an internal link can help rank your site better in SEO, so learning how to do it in HTML is essential. This is where the anchor tag <a href> comes in.
Using the tag <a> alone will make a text to appear clickable, but nothing will happen when you click it. That’s because you also need to specify the site address using the href attribute.
<p>Please click <a href="http://example.com">here</a> to visit another link.</p>The URLs that you can add to the href attribute are as the following:
- Absolute URL (a full link)
- Relative URL (another page within the same site)
- Specified id (such as #about)
- Protocols (mailto:, tel:, ftp://. etc)
- JavaScript
Also, if you’re linking to another website, you will cause visitors to leave your page. You can avoid this by using the target attribute.
<p>Click <a href="http://example.com" target="_blank" here to open a link in a new tab!</p>
Fill in the value with “_blank” to make the link open in a new tab.
Color Attribute
You can change the color of your text by using the color attribute. It can be used alongside the paragraph tag, and the value can be set to the name of the color such as red, blue, green, etc.
You can also choose to insert the hex code instead for a more specific color.
<h1>This <span color="red">word</span> will be in red, while this <span color="6bf442">word</span> will be in green.</h1>Note that this won’t work in HTML5. Similar to align, you need to use style attribute instead.
<h1>This <span style="color:red">word</span> will be in red, while this <span style="6bf442">word</span> will be in green.</h1>The result will look like this.
![]()
Using the color name as the value is more advised for beginners because it’s hassle-free. However, the hex code will give you more option if you think the color “isn’t green enough”.
If you prefer the freedom of choosing the very specific shade, you can do a quick Google search with the keyphrase “hex color picker”.
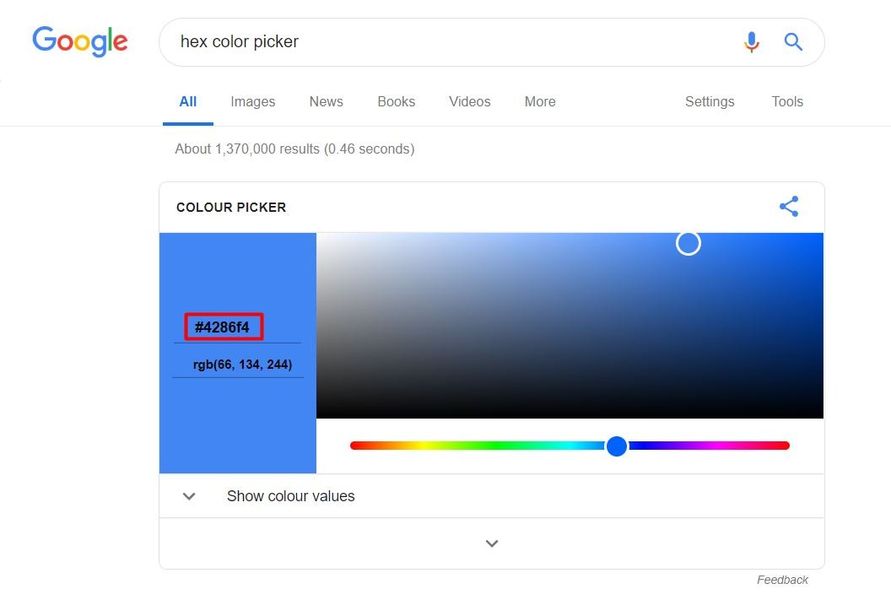
Google’s integrated color picker tool will allow you to choose one from every available color and get the hex code in an instant.
Where to Learn HTML for Beginners?
With all the available HTML courses on the internet, why should you learn by yourself? Take a look at our best pick of HTML learning platforms where you can learn from zero.
These sites have different features. Feel free to try any of them to see which helps you understand it better.
For a more detailed overview, take a look at our list of best platforms to learn to code for free.
Conclusion
Learning the basics of HTML will advance your progress to become a website developer. It is certainly a must-have knowledge to get, especially if you’re looking to create a website without any website builder’s help.
We have proven even beginners can easily learn HTML with no hassle. We hope our guide was useful. Good luck!